Living On Food Stamps: The purpose of This blog is to share ideas and to offer encouragement. In the comment section Please share your story and how you are managing during these tough economical times. I truly believe through friendships, encouragement, love, compassion and sharing we will get through this and perhaps even come out wiser and stronger.
Saturday, February 19, 2011
Monday, February 14, 2011
How To Compost Through The Winter Months Inside (video)
Quick-Growing Vegetables for the Impatient Gardener
by Colleen Vanderlinden
 Photo Credit: Colleen Vanderlinden
I always laugh when people say that gardeners have to be patient. I'm a completely obsessed gardener, and I'm easily the most impatient person I know.
So there goes that theory.
The good news is that while I grow many plants that are worth the wait (tomatoes, pumpkins, corn...) there are plenty of things I can grow that will satisfy my impatience for garden-fresh food in very little time.
Quick-Growing Vegetables
Mesclun
I am a salad lover, so I grow tons of mesclun, not only outside in pots and along the edges of my garden beds during the growing season, but also indoors during the winter. You can buy specialty mesclun mixes, such as Asian mixes, spicy mixes, or colorful mixes (which are pretty in addition to being delicious). Simply sprinkle the seeds heavily over the surface of your soil, cover with a fine sifting of soil, water regularly, and let it go. Within about three weeks, you'll be able to cut your first salad. You'll be able to get three good, healthy harvests before you'll have to sow more seeds -- it's a good idea to sow a new area or container full of seeds every week or so to keep yourself continuously in fresh mesclun.Radishes
Radishes are great to grow with kids because not only can they harvest the fruits of their labor within a month or so, but the seeds are large enough to handle easily. Radishes are perfect to grow in a garden bed or a container, and you're not limited to just the typical red ones with white flesh -- look for extra spicy 'Black Spanish' radishes, or pretty 'Easter Egg' radishes, which are a fun mix of red, purple, and pink radishes.Asian Greens
Like mesclun, above, you can sow many Asian greens, such as tatsoi, bok choi, and mizuna and have a harvest of tender greens to add to salads, sandwiches, or stir fries in just a few weeks.Wheat Grass
I don't know how many people consider wheat grass to be a vegetable, but why not? If you love wheat grass juice, or are a fan of adding it to smoothies, why not grow your own? A couple week's time, and you can harvest the wheat grass by cutting it with scissors or pruners -- it will keep growing, and you can continue to chop it as needed. Like mesclun, it's probably a good idea to sow a couple of containers of wheat grass, so that after you cut the grass in one container down, you have another container ready to harvest.Bush Beans
In about six weeks after planting, you can start harvesting thin, tender bush beans from your garden. To keep the plants productive, harvest when the beans are small -- if you let the beans get too big, the plant will start putting its energy into helping those pods produce seeds, rather than blooming to produce more pods, Unlike pole beans, bush beans are perfect for containers. Be sure to sow a few more beans every week or two so you are sure to have a continual harvest. For a more decorative look, consider growing colorful beans, such as the heirloom 'Royalty Purple Pod' or pale yellow 'Golden Wax' bush beans.All of these quick-growing vegetables are sure to satisfy even the most impatient gardener. Best of all, by adding them to your garden, you ensure that you will always have something to harvest. You may be waiting on tomatoes or eggplants, but rest assured that while you wait, you can still harvest fresh radishes or beans from your garden. That alone is worth planning for a few of these veggies in this year's garden.
More About Growing Your Own Food:
The Top Ten Most Nutritious Vegetables, and How to Grow Them
Beyond Salads: Growing a Garden to Feed a Family
Keep Monsanto Out of Your Vegetable Garden
Sunday, February 13, 2011
Grow Your Own Sprouts All Year Round
A Little extra info:
http://www.living-foods.com/articles/largebeans.html
SPROUTING LARGE BEANS: PROBLEMS
by Tom Billings
The following was posted on veg-raw, an e-mail list for raw food vegetarians. It is a reply to the question: how can I eat large, crunchy sprouted beans like kidney beans?
A: Raw kidney beans reportedly are toxic when eaten in large amounts; the toxin is eliminated by cooking. As raw kidney bean sprouts have a bitter, highly unpleasant flavor it could be difficult to consume a harmful amount. Some people who have tried to eat them raw, reported to me that they could not keep them down; they involuntarily vomited after eating them! Anyway, if you insist on eating kidney beans the best way is to sprout them for 1-1.5 days and then cook the sprouts - they require less cooking than dry/soaked beans. Cooked large sprouted beans are not bitter - their taste is similar to that of unsprouted, cooked beans - and they generally produce little or no flatulence (a good reason to sprout, then cook, large beans if you wish to eat them).
Most of the large beans contain enzyme inhibitors and are very hard to digest when raw. Further they usually produce large amounts of gas/flatulence, which is not good for you in the long run. The enzyme inhibitors are destroyed by the heat of cooking; because of this some raw food authors suggest that large beans be cooked before eating, if you choose to eat them. (Certainly there are many other seeds that can be sprouted and eaten raw). Another factor that prevents one from eating raw, sprouted large beans is their taste - extremely bad, so bad that most simply cannot tolerate eating them!
There are limited uses for some of the raw, sprouted large beans. Sprouts of black beans, blackeye peas, and small red beans, are sometimes used in small quantities as a flavoring ingredient in sprouting mixtures and/or salads (in effect, used as a condiment). Sprouted garbanzos, peanuts (also a legume - not a nut), and peas can be eaten alone or used as ingredients for recipes such as raw hummus. Soybean sprouts when short are bitter, astringent, and inedible unless cooked; if sprouted long enough they are (theoretically) edible raw, though you may find their taste unpleasant/intolerable.
Keep in mind that there are many other sprouting seeds, including many small beans/legumes (lentils, garbanzos, beans: mung, adzuki, urad, moth, etc.) that are edible when raw. Perhaps you can substitute small sprouted beans for large in your food preparation?
Saturday, February 12, 2011
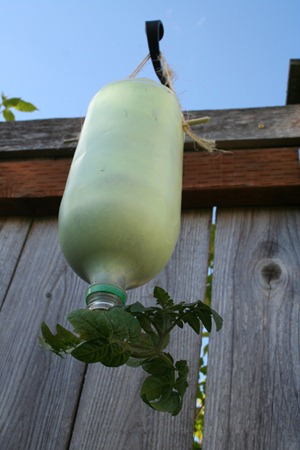
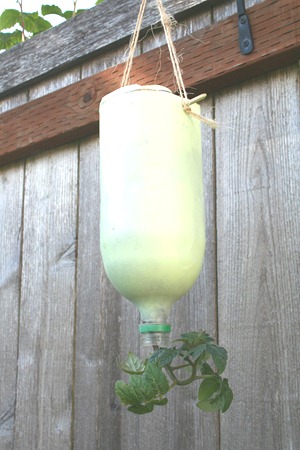
2-liter bottle upside down tomato planter
Though my first attempt at an upside down tomato planter worked out great, I have a habit of forgetting to water the plants everyday. More commonly when we have decent rains when only the hanging tomato planters need to be watered. So this year I have modified my design a little to make this a little easier. As a bonus you can create this new version much quicker and minimal tools.
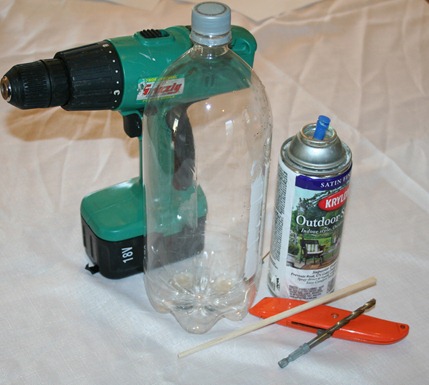
Materials required
- Empty 2-liter bottle
- Spray paint
- Drill or hot nail
- Chopstick or 1/4 in stick
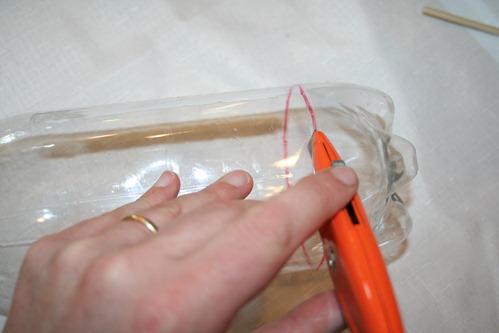
Step 1 – Cut off bottom
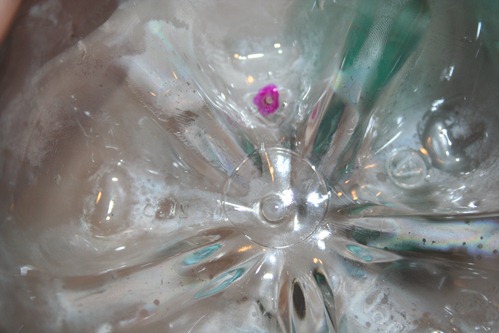
There is a natural ridge at the bottom of the two liter bottle, simply cut at this ridge and remove the bottom.
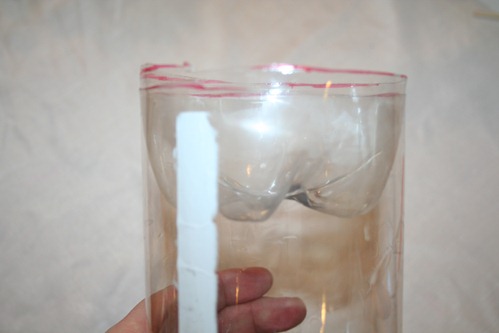
Step 2 – Attach water reservoir
Take the removed bottom, flip it over, and insert it into the bottom of the bottle until flush with the top.
Step 3 – Drills Holes
First you need to drill a small hole in the bottom of the reservoir (the bottom you cut of) Use the smallest drill bit you have, this will reduce the water flow coming into the planter during rainfall and/or manual watering. With this reduced flow there should be much less soil loss during watering.
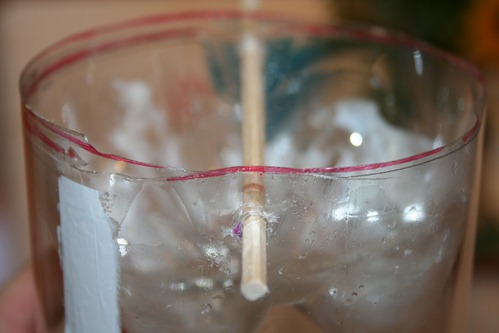
Second you need to drill two holes about 1/4 inch from the edge with a 1/4 inch drill bit. It is a little difficult to get enough pressure against the plastic to make this hole without causing the plastic to collapse. To take care of this place a small piece of wood on the floor and drill the holes from the inside.
Step 4 – Paint planter
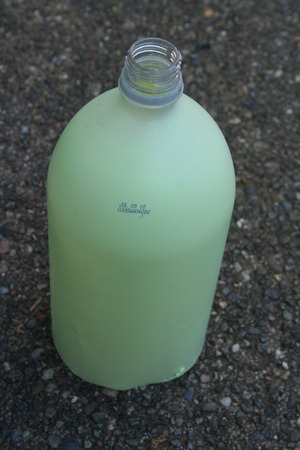
You want to protect the roots from being exposed to direct sunlight so you need to cover the outside. This can be done with contact paper, duct tape (as I have done in the past) or for a fast cleaner look just quickly add a quick coat of spray paint to the outside. It is probably best to use paint that is made to adheres well to plastic, though in my case I had some nice multipurpose light green paint leftover from another project that with a few hard rains appears to be holding up well.
Step 5 – Secure with stick (chopstick) and fill with soil
Now add your plant (tomatoes and peppers are my favorites) to the bottom (previously the top) of the planter by carefully pushing the roots through the hole or alternatively you can the plant out from the inside. If your plant is too large to do this safely you may also cut a larger opening in the bottom, but I would recommend wrapping a sponge or coffee filter around the plant to assist in keeping the dirt in the planter.
Fill your planter with a mixture of 1 part perlite to 2 parts (potting mix, peat moss, coconut coir) with the top 1/2 inch being only (potting mix, peat moss, coconut coir) After a couple of waterings, this 1/2 inch layer will compact and restrict the water flow for a slower and more distributed watering.
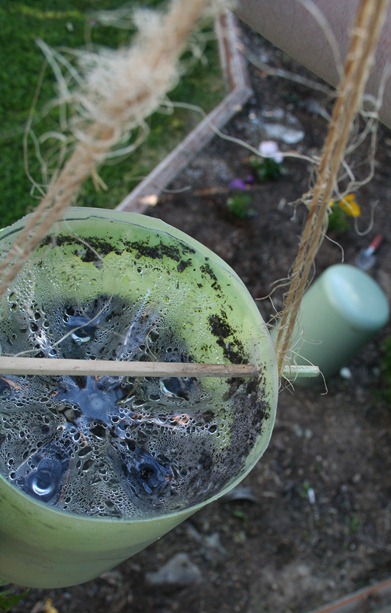
Use the thinner end of your chopsticks to thread it through both holes and both sets of plastic, attach a piece of twine attached to bother ends, and hang wherever the plants can get some good full sunshine and you should have plenty of early tomatoes this summer.

Thrift Shop Treasures
Top Ten Most Nutritious Vegetables and How to Grow Them in Your Garden | Food Freedom
By Colleen Vanderlinden
TreehuggerA perfectly ripe, juicy tomato, still warm from the sun. Sweet carrots, pulled from the garden minutes (or even seconds!) before they’re eaten. Growing your own vegetables is one of those activities that balances practicality and indulgence. In addition to the convenience of having the fixings for a salad or light supper right outside your door (or on your windowsill), when you grow your own vegetables, you’re getting the most nutritional bang for your buck as well. Vegetables start losing nutrients as soon as they’re harvested, and quality diminishes as sugars are turned into starches. For the tastiest veggies with the best nutrition, try growing a few of these nutrient-dense foods in your own garden.
And don’t let the lack of a yard stop you – all of them can be grown in containers as well.
1. Broccoli
Broccoli is high in calcium, iron, and magnesium, as well as Vitamin A, B6, and C. In fact, one cup of raw broccoli florets provides 130% of your daily Vitamin C requirement.
- How to Grow Broccoli
- Grow Broccoli in Containers: One broccoli plant per pot, pots should be 12 to 16 inches deep.
- What to Watch Out For: Cabbage worm. If you start seeing pretty white butterflies fluttering around your broccoli, you’re guaranteed to start seeing little green worms all over your broccoli plants. To avoid this, cover your broccoli plants with floating row cover or lightweight bed sheets. If you start seeing cabbage worms, simply pick them off by hand.
2. Peas
There is nothing like peas grown right in your own garden – the tender sweetness of a snap pea just plucked from the vine is unlike anything you can buy in at a store. Aside from being absolutely delicious, peas are high in fiber, iron, magnesium, potassium, and Vitamin A, B6, and C.
- How to Grow Peas
- Grow Peas in Containers: Sow peas approximately 2 inches apart in a pot that is at least 10 inches deep. Provide support for peas to climb up.
- What to Watch Out For: Hot weather. Once the weather turns hot, pea production will pretty much shut down. Grow peas in early spring and late summer/autumn, or any time of year when temperatures are consistently between 40 and 85 degrees Fahrenheit.
3. Beans (especially navy beans, great northern beans, kidney beans)
While snap beans (green beans/wax beans) are a great addition to any garden, it’s the beans we grow as dried beans that are real nutritional powerhouses. Dry beans, in general, are high in iron, fiber, manganese, and phosphorous.
- How to Grow Beans
- Grow Beans in Containers: Bush beans are your best option for growing in containers. Plant beans four inches apart in a container that is at least 12 inches deep.
- What to Watch Out For: Harvest at the right time. Harvest dry beans when the pods have completely dried on the vine. The pods should be light brown, and you should be able to feel the hard beans inside. Shell the beans, and let them sit out a few days to ensure that they’re completely dry before storing them in jars in a cool, dark, dry place.
Photo Credits (left to right): norwichnuts, photon, S. Diddy, via Flickr Creative Commons Attribution License.
4. Brussels Sprouts
The bane of many a childhood, Brussels sprouts get a bad wrap mostly due to overcooking. When prepared right, Brussels sprouts are sweet, tender, and delicious. They also provide tons of fiber, magnesium, potassium, and riboflavin, as well as high levels of Vitamins A, B6, and C.
- How to Grow Brussels Sprouts
- Grow Brussels Sprouts in Containers: Grow one plant per 16-inch deep container.
- What to Watch Out For: Cabbage worms (see “Broccoli, above.)
5. Tomatoes
Fresh, homegrown tomatoes are the reason many gardeners get into vegetable gardening in the first place. There’s just nothing that compares to eating a perfectly ripe tomato, still warm from the sun. Tomatoes are also incredibly good for us, packing plenty of fiber, iron, magnesium, niacin, potassium, and Vitamin A, B6, and C. They’re also a great source of the antioxidant lycopene.
- How to Grow Tomatoes
- Grow Tomatoes in Containers: Container sizes will vary depending on the variety you’re growing. If you’re growing an indeterminate variety, your container will need to be at least 18 inches deep. For determinate varieties, 12 inches is a good depth, and for dwarf or “patio” type tomatoes, 8 inches is perfect. One tomato plant per pot.
- What to Watch Out For: Tomato horn worm can be a problem in many areas – these large caterpillars should be removed by hand whenever you see them. Also watch out for signs of blight, which is a real problem in many parts of the U.S.
6. Red Bell Peppers
Red bell peppers are high in potassium, riboflavin, and Vitamins A, B6, and C – in fact, one cup of red bell pepper packs an amazing 317% of the recommended daily allowance of Vitamin C and 93% of the recommended Vitamin A.
- How to Grow Peppers
- Grow Peppers in Containers: Plant one pepper plant per each 8 to 12 inch deep pot.
- What to Watch Out For: Aphids and flea beetles are the two most common insect pests when growing peppers. While both can be controlled with insecticidal soap, which is a common organic option, you can also make all-natural, homemade sprays to deter these pests. A tomato leaf spray will get rid of aphids, and garlic/hot pepper spray works very well on a flea beetle infestation.
Photo Credits (left to right): La Grande Farmer’s Market, SummerTomato, color line, via Flickr Creative Commons Attribution License.
7. Beets
Beets are a great “two-fer” crop – you can harvest the beet roots, of course, but you can also harvest and eat the greens. Young beet greens are delicious when added raw to a salad, and larger beet greens can be sauteed as a quick side dish or used the way you’d use other greens such as spinach. Beet roots are very high in iron, potassium, and vitamin C. Beet greens are even better, as they are high in iron, calcium, magnesium, potassium, zinc, and Vitamins A, B6, and C.
- How to Grow Beets
- Grow Beets in Containers: Plant beet seeds three inches apart in a container that is twelve inches deep. Because each beet seed is actually a cluster of seeds, be sure to thin the seedlings to one per cluster. Thinnings can be added to salads or sandwiches.
- What to Watch Out For: Knowing when to harvest. Beet roots are at their best when they are harvested small – between one and two inches across. At this size, they are sweet and tender. Larger beets tend to be kind of woody and less flavorful.
8. Leaf Amaranth
Leaf amaranth is a less-common vegetable that is well worth a try in your own garden. The leaves have a sweet and slightly tangy flavor that works well in a variety of dishes, from stir-fries and soups to simply steaming it all by itself. As a bonus, leaf amaranth is one of the few heat-tolerant greens. It won’t bolt in the heat of summer the way spinach and kale are prone to. Nutritionally, leaf amaranth is very high in calcium, iron, magnesium, phosphorous, potassium, riboflavin, zinc, and Vitamins A, B6, and C. Everyone should be growing this!
- How to Grow Leaf Amaranth
- Growing Leaf Amaranth in Containers: Scatter the tiny seeds over the soil’s surface in a pot that is at least 8 inches deep. Harvest the leaves when they are two to four inches tall. You will be able to get at least two or three harvest before you’ll have to sow more seeds.
- What to Watch Out For: Leaf amaranth is fairly easy to grow, and relatively problem-free. Rarely, leaf miners can become a problem.
9. Carrots
Carrots are at their sweetest, crunchiest best when freshly harvested from the garden. These icons of healthy eating deserve their “good-for-you” rep – they’re very high in fiber, manganese, niacin, potassium, and Vitamins A, B6, and C. Their only drawback is that they do tend to be high in sugar, so if you’re watching your carb intake, you’ll want to limit the amount of carrots you eat.
- How to Grow Carrots
- Grow Carrots in Containers: Sow carrot seeds two to three inches apart in a pot that is at least twelve inches deep. Look for shorter varieties, such as ‘Thumbelina,’ or ‘Danver’s Half Long.’
- What to Watch Out For: Harvesting at the perfect size. Carrots are at their tastiest when harvested small. Leaving them in the ground too long can result in overly large, woody carrots. You’ll also want to make sure to keep your carrots evenly moist, as letting the soil dry out too often can also result in somewhat bitter, fibrous carrots.
Photo Credits (left to right): Oakley Originals, djprybyl, djprybyl, via Flickr Creative Commons Attribution License.
10. Leafy Greens
OK, I cheated here. I can’t recommend just ONE leafy green, because they are all incredibly good for us, as well as delicious — kale, collards, spinach, turnip or dandelion greens — how can you possibly choose just one? In general, the “green leafies” contain high amounts of calcium, iron, potassium, and Vitamins A, B6, and C.
- How to Grow Kale and Other Leafy Greens
- Grow Greens in Containers: Grow one kale or collard plant per ten inch deep pot. Other greens can be grown a few plants to a pot — they should be planted at least 4 inches apart and harvested small.
- What to Watch Out For: Heat and cabbage worms. Most leafy greens are cool-weather crops, so they’re best grown in spring and fall in most areas – hot weather will cause them to bolt. In addition, many of these greens are members of the Brassicas family, which means they are prone to cabbage worm infestations. Control them with the same methods outlined in the “Broccoli” section, above.
Try growing one or two (or all!) of these nutrient-dense, delicious vegetables in your own garden, and you’ll get double the health benefits: healthy food and time spent outdoors, nurturing your plants.
More About Growing Your Own Food:
Beyond Salads: Grow a Garden to Feed a Family
Complete Guide to Summer Vegetable Gardening
66 Things You Can Grow, At Home, Without a Garden

Sunday, February 6, 2011
To Die For Beans, Greens and Garlic Soup ~ Pennies Per Serving
Below is the recipe for a piping hot bowl of garlicky goodness. One of the best soups to slop up with a slice of no-knead buttered bread. Enjoy!
- 2 tablespoons olive oil
- A Gazillion cloves of garlic (or 4 or so, however many tickles your fancy), peeled and chopped
- 1 onion, chopped
- 6 cups or so of Vegan chicken flavored broth
- 1 (15.5 ounce) can cannellini beans,drained and rinsed
- 1 cup ditalini or other small pasta ***I like to use Barley because it never gets soggy. If I decide to use a Pasta I never cook it in the soup. I cook it separately then add it to my soup per serving. I hate soggy pasta***
- baby spinach, escarole, green chard or other greens
- salt and black pepper to taste
- **Shredded Parmesan/Romano Cheese Optional, I use a Vegan alternative
Friday, February 4, 2011
Make A Loaf of No Knead Bread For 39 cents

Very simple instructions and even better, hardly any work. Delicious:
My Bread by Jim Lahey with Rick Flaste
An excellent main dish to go with your home made bread
Penne Pasta with Cannellini Beans and Escarole |
1 (16 ounce) package dry penne pasta -or- what ever shape pasta tickles your fancy
|
- canned diced tomatoes
- 2 -or- more ( I like more) Tablespoons Olive Oil
- salt and ground black pepper to taste
- Parmesan/Romano Cheese **optional
Boil your pasta until al dente; drain
Ladle sauce and beans over individual dish of the cooked pasta to serve. Personally, I like to make sure there's enough extra sauce to dip my buttered bread in.....Cheap, Delicious and Oh-So-Utterly-Divine!
