Peace

Tuesday, August 31, 2010

Homemade Granola Bars

Homemade Granola Bars « Wit & Whistle


These granola bars have whole wheat flour, wheat germ, and rolled oats. You can throw in any kind of dried fruit or nuts. Of course I had to put chocolate chips in mine!
homemade granola bars recipe
2 cups rolled oats
3/4 cup packed brown sugar
1/2 cup wheat germ
1 teaspoon ground cinnamon
1 cup whole wheat flour
3/4 teaspoon salt
1/2 cup honey
1 egg, beaten
1/2 cup vegetable oil
2 teaspoons vanilla extract
1/2 cup mini chocolate chips
1/2 cup chopped nuts
1/2 cup dried cranberries


Preheat the oven to 350 degrees F (175 degrees C). Grease a 9×13 inch pan.
In a large bowl mix oats, brown sugar, wheat germ, cinnamon, flour, chocolate chips, nuts, cranberries and salt. Make an indention in the center of the mixture, and pour in the honey, egg, oil and vanilla. Mix well. (Using your hands makes it easier to get everything coated.)
Press the mixture into the pan. Don’t spread the mixture all the way to one edge of the pan (see photo). This makes it easier to scoop out the finished bars. Bake for 20 to 30 minutes until the edges begin to brown. Cool for 5 minutes, cut the bars while they are still warm, and store the granola bars in an airtight container so they won’t dry out.


Microwave Popcorn: Home made, cheap and easy

Go to the supermarket and look at the boxes of microwave popping corn. $1.99 to $3.00+ a box and the odds are you won't find one seasoned to your individual taste. You just have to settle for what they offer.


Not anymore, my friends. I am here to liberate your palates form the work-a-day microwave popcorn. Today, you will learn that which they don't want you to know. You will learn how simple and cheap it is to make your own popping corn. Lets get started.

First you will need the following ingredients:

1/4 cup of popping corn (generally $0.99 for a pound bag. This is enough to make at least 50 bags of microwave corn)
1 Teaspoon extra virgin olive oil
To taste - popcorn salt (it has finer granules than table salt with the same taste)

And the following tools:

A stapler
A teaspoon
A measuring cup
A brown paper bag
and
A microwave

How To Make Your Own Underwear 3

http://drummbellina.typepad.com/drummbellina/2010/04/diy-tutorial-how-to-make-your-own-cute-knickers-printout.html

I love this tutorial. By clicking on each page it will enlarge the image for you.

Knickers diy 1

.Knickers diy 2 making the templates

.Knickersfinished 3

.Untitled

Make Your Own Underwear 2


Make your own panties tutorial

 Just because underwear is expensive there's still no reason you have to walk around bare-butt. I   remember several times in my life when I only had two pairs of shredded underwear.  (I just love the internet with all the empowering ideas offered here).  Even when you don't have two nickles to rub together you can always get your hands on an old t-shirt or sweat shirt and make yourself one -or- two -or- three pairs of underwear...and for no $$.

.

Photobucket

I've made another pair and taken pics, so you can SEE how easy they are. This is a great way to use up your fat quarters (we all have them lying around don't we?)

As with all my tutorials, this is totally customizable (is that even a word?). This is my own work, so if you repost PLEASE link back to me, thanks!

To make the pattern.

We all have different preferences when it come to undergarments. Personally, because it's cold in Wales, I like mine to cover my bits. You could change this pattern to make them however you prefer.

Find a pair of knickers that your don't mind cutting up. Preferably ones with the elastic starting to go. We ALL have those, don't we? Cut the sides open and lay the fabric flat. Cut off the elastic if it helps. Pin the old knickers on some paper, I used a piece of newspaper for my pattern becuase it's cheap and you can use lots to make different variations. Now cut it out, and then try to see how it fits.

A good way is to pin to the underwear you are already wearing. I have saved you all the horror of pictures of these early stages. Adjust as necessary until you are happy with the basic shape. Then, fold the paper in half lengthwise and neaten all the edges off (so we get even curves on both sides of the pattern). You now have something like a bottom heavy hour glass.

Photobucket

Unfold and do a final check for fit.

To make the knickers.

Before cutting out, think about the fabric you are using. If you are using plain fabric, or one without an obvious "right" and "wrong" way up, proceed. If your fabric has a pattern with a right way up, you will need to split your pattern in half at the middle and cut out two sections (leaving a seam allowance), otherwise you'll end up with half of your design upside down.

For comfort I've added a gusset section. For obvious reasons, this should be cotton (not synthetic). You need to adjust this to fit your pattern, adding a 1cm seam allowance to each side. Mine was about 14cm by about 8cm.

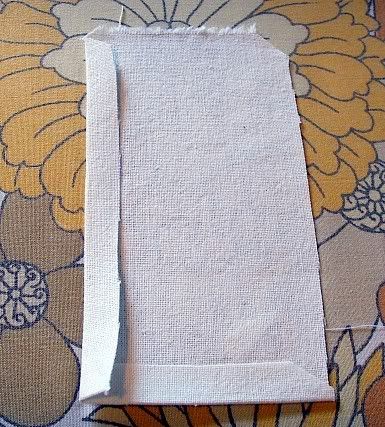
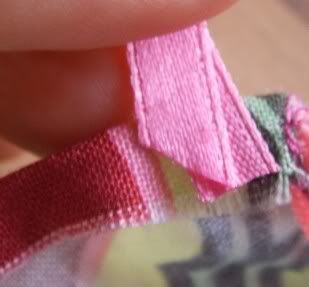
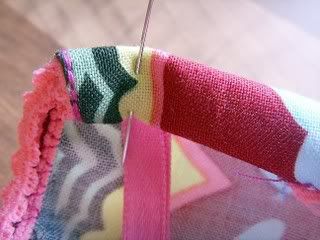
Cut off the corners of the strip and fold all edges in, press and sew down with a continous line of stitching. Leave the needle in the "down" position when turning corners.

Photobucket

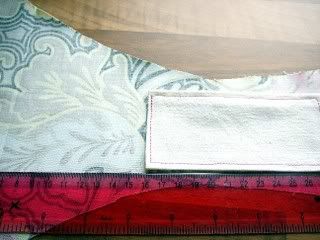
Pin in place on the wrong side of the fabric piece, and sew along the two long edges.


Photobucket

Attaching the elastic.

You'll make life a lot easier if you use a needle for stretch fabrics and a stretch stich on your machine. if you have an overlocker, even better.

Photobucket

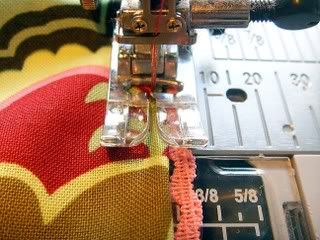
Starting at one of the straight edges at the back or front, line up the edge of the elastic with the raw edge, on the right side of the fabric. Use a zig zag stitch to stitch the elastic to the edge of the fabric, catching the raw edge in the zig zag stitch. Pull the elastic slightly as you feed it through the machine, taking your time.
Then fold the fabric to the wrong side (so that the elastic is now decorative side out) and use a straight stitch to stitch in place (pulling the fabric flat as you do so).

Photobucket

Repeat for both top sides, and around the legs.

Photobucket
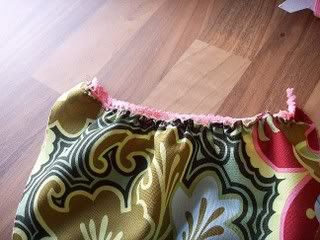
The edges should all be like this.

Measure 4 pieces of matching ribbon. In my case, I wanted the ties 30cm long, but I was using a ribbon that frays easily. You could either run some fray stop along the edge or, like me, use a double length so that both raw ends are encased in the side seam. Of course, you could also make your pattern so that you actually sew the side seams together at this point.

I cut 4x 60cms (so that I could double it over).

Line the raw ribbon edge with the raw side edge and fold over twice.

Photobucket

Photobucket

This traps the ribbon in the side seam. Pin in place and sew a couple of layers of stitching along the side seam for strength.

Photobucket

Now parade around your bedroom in your funky new knickers.


**********UPDATE*************

I was asked if I used stretch fabric for the main part, and here is my answer.

No, I just used cotton. I do have some T shirt fabric that I mights have a play with. Without wanting to sound too rude about it, if you have a "larger" bottom (like my big fat thing!) don't stretch your elastic so tightly so it doesn't make them baggy. I suggest having a play with some leftovers if you're unsure. Have fun.

Make Your Own Underwear

How to Make Your Own Underwear - CraftStylish 
 Grabbed a pair that fits well, an old partial T, and some quarter-inch elastic, and here's what I did:
1. Cut out the pieces. Fold your underwear in half along the center front, carefully lining up the side seams and leg openings. Lay it on top of the folded T-shirt, aligning the folds. Lay the underwear on top of the shirt to use as a pattern reference

 
Homemade undies for all!

.
Try to get the whole front piece to lie flat, but you may only be able to work with one section at a time. Cut around the edges, adding 1/4-inch seam allowance as you go. Only cut around the parts that lie flat, then flatten the rest and finish cutting.You may have to work in sections if the whole front won't lie flat at once.


Repeat for the back.Here are my cut-out front and back pieces. Note that I had to piece together the shirt to get a big enough piece for the back because I was using scraps.


Lay the cut-out front piece on another folded scrap of shirt and cut around the crotch area as shown, for the separate crotch panel found in most undies.Use the front to cut out the panel piece.


2. Sew the seams. With right sides together and the front piece on the bottom, line up the back and front along the crotch seam. Lay the panel piece on top, face down. Stack the three pieces together to sew the crotch seam. The front will be on the bottom (face up), the back in the middle (face down), and the panel on top (face down).


Seam all three layers together at 1/4 inch. Flip the panel up so it lies against the front and the seam is enclosed inside, and pin it in place along the leg opening edges. (The front edge of the panel usually remains unseamed, but you can stitch it down now if you want. I used the hem of the T-shirt for this edge so it was already finished, but you could hem or serge it, or leave it raw.) Now put the front and back together, with right sides facing, and pin and sew the side seams.The pieces are all assembled.


 Turn the underwear right-side out.
3. Sew the elastic edges. Starting at one side seam, lay an end of elastic on the right side (seems wrong I know, but trust me here!) edge of the waistline, matching the edge of the elastic to the waist edge. Begin stitching (I used a three-step zigzag, but a regular zigzag works, too), stretching the elastic ever so slightly as you go.
 First, zigzag the elastic to the right side of the waist edge.


You don't want it to gather the edge, but you do want a snug fit. Work around the entire waistline, overlapping the elastic 1/2 inch where you began, and cut off the excess. Be sure to backstitch securely.This is how it will look from the wrong side after the first elastic seam.


Then flip the elastic down onto the wrong side (inside) of the pants and stitch again, this time working from the wrong side (elastic side up).After turning the elastic to the inside, zigzag again with the elastic facing up.


Repeat the process for each of the leg openings, enclosing the panel into the seams as you go.Here are both sides (in and out) of the finished elastic edge.


And they're done!

Sunday, August 29, 2010

Storing Soups Long Term

Dehydrate2Store.com | Recipes

Now who doesn't love a quickie? ~ get your mind out of the gutter I mean a 'quick meal'.  I think these are  wonderful, nutritious, delicious & inexpensive meals.  Dehydrating from your garden or getting veggies in season from Farmer's Market a whole lot cheaper than in the grocery stores will be a real money saver over the winter. Learn How To Dehydrate Videos


Total Cooking Time:

Serving Size:
servings
Ingredients:
1 Oxygen pack
1 Vacuum bag
- All ingredients to make your soup or stew (except meat)
1 Mylar bag
1 Zip-lock bag

Preparation:
Place all dehydrated ingredients for your soup or stew into a vacuum bag except meat, bullion cubes, starches, flour, or powdered milk.
Place bullion cubes, starches, flour or powdered milk into a zip-lock (or other) bag and then place into your vacuum bag.

Remember, it is not recommended to store your own dehydrated meats long term. Do not include them into your package.

Add one 100cc oxygen pack and then vacuum seal.
Label your bag and place into a Mylar bag to deter light. This will ensure the longest shelf-life.

If your want to place more than one soup per Mylar bag, wrap each vacuum bag in plastic wrap so that possible rubbing together does not cause holes.
Label your Mylar bag with contents and date.
When stored properly your soup will last up to 30 years!
To prepare soup simply cut open bag and pour into crock pot with necessary amount of water. Also add bullion cubes, starch, ect. Remember to remove your oxygen pack!

Now is the time to add fresh meat if desired.
Allow to slow cook and enjoy!


Saturday, August 28, 2010

How To Dehydrate A Fresh Pumpkin and How To Bake a Pumpkin Pie From Dehydrated Pumpkin ~ Simply Amazing

Preserving the harvest with a dehydrater.

My Son and Daughter-in-Law  bought me a food dehydrator: Pictures coming soon, meanwhile I found these great 'how to' videos on YouTube.
NOTE: I'm just learning about dehydrating foods for long term storage so I am no expert, I am just sharing what ever info I come across. I can say that I successfully dehydrated celery, zucchini, sliced tomatoes, green peppers and summer squash....so-far-so-good.


Dehydration of Food, Drying Food Recipes and Dehydrator Use

Dehydration of Food, Drying Food Recipes and Dehydrator Use

Monday, August 23, 2010

Roasted Dandelion Root “Coffee”Iris flourishO

MaryJanesFarm | Recipe/Project of the Week | Roasted Dandelion Root "Coffee"


***Okay, I just found this recipe so I've not had the chance to try it yet but come next spring I will be  sure to embarrassing my kids by taking  my bucket in hand, canvass the neighborhood and digging up dandelions.***

When brewed properly, dandelion root coffee closely resembles the rich flavor of traditional coffee, and it contains a wealth of vitamins and minerals.

1. Gather:
One 5-gallon bucket of dandelion roots (to yield about 10 gallons of coffee).
2. Prepare the Roots:
To wash the roots, fill the bucket with water and agitate the roots with your hands. Pour off the muddy water and repeat this process a few times until the water runs clear and you have a pile of luscious golden roots. Don’t worry if there’s still some dirt left on them—you’ll wash them again after chopping. With a sturdy knife, cut the roots into chunks. Put these into a large bowl (or sink), fill with water, then rub the roots and rinse until clean. Drain until fairly dry or pat with a towel. Chop about 2 cups of root chunks at a time in your food processor until they’re chopped into small, coarse bits.
3. Roasting the Roots:
Spread the coarsely ground roots on cookie sheets about 1/2-inch thick. Place as many sheets as you can fit into your oven, set at 250°F, and leave the oven door slightly ajar to let moisture escape. The roasting process takes about 2 hours. Stir frequently and rotate the cookie sheets occasionally to ensure even drying and roasting. As the roots dry, they’ll shrink and darken to a rich coffee color—but be careful not to let them burn. Cool completely and store in glass jars. Flavorful additions such as anise, cinnamon, ginger, and carob can be added if you like.
4. Brewing the Coffee:
You can either grind the roots in a coffee mill and brew in a coffee pot, or you can place the coarsely ground roots in a tea infuser and boil in a pot of water. Use 1 tablespoon of roasted roots for each cup of water (1/3 cup per quart of water). Adjust to your taste if you like it stronger or weaker. Add a dash of cream and sugar if you like, and enjoy a steaming cup of Roasted Dandelion Root Coffee!


Make Your Own Dog Kibble

 A real eye opener about Dog Food: http://www.dogfoodproject.com/


Non-related article:  Do-it-Yourself Natural Pet Food Recipe


 Kim DeLeary
Why pay for expensive and packaged pet food when you can make your own easily? Take care of your canine friend with homemade kibble that you know is fresh and filled with nutrition. Depending on how many large baking pans and the quantity of ingredients you have, you can also cook kibble to freeze and save for later. Following this recipe will net you at least 14 cups of kibble depending on how much meat you put into it.
Your homemade kibble will be fresh and will contain human-grade ingredients. It will not contain any fillers or preservatives and will be a healthier alternative to many preparations you can find in the stores. You can also customize the kibble recipe by adding your dog's favorite ingredients.

An Added Note not by the original author but what I've found doing further research: Before you switch to having your dog eat homemade dog food, you should first check with your vet to see if it will be okay for the animal.

Dogs need a diet that consists of 30% vegetables, 40% meat, and 30% starch. To be sure that your dog has a well-balanced diet, be sure you follow that formula. It's always a good idea to add a grain to your dog food, such as wheat germ, whole wheat bread to meat dinners, cooked oatmeal, and kibble.

Tip: Dogs cannot digest vegetables very well, so you should put the vegetables through a food processor before being added. And the food you make for them should always be served at room temperature. And if your refrigerate it, do not leave it in the fridge for longer than 3 days.


Ingredients

To create the basic recipe, mix together in a very large bowl:


  • 6 cups of a mixture of potato flour and rolled oats. (You can also use whole wheat and rye flour as well. Avoid the over-processed white flour.)
  • 3 cups of cooked brown rice.
  • Add 2 cups of dry milk
  • And 2 teaspoons of bone meal   NOTE: NOT from a Garden Center!!!!
  • Blend in 3 cups of water to the flour mixture.
  • Carrots, spinach, and broccoli are vegetables that are okay, but remember to put them through a food processor before you add them to the dogs food. 
In another bowl:
  • Beat 4 eggs.
  • Melt 1 cup of lard and mix into the eggs.
Stir the egg mixture into the flour mixture. Pour this mixture into a large, greased baking pan. Suitable pans are pizza pans, cookie pans and cake pans. You may need a few of these to do the job. It is okay to use a deeper pan; it will just take longer to bake. You can also add carrots and peas to your recipe, but remember that it's easier for your pet to digest cooked, shredded, juiced and mashed vegetables.

How to bake

Preheat the oven to 175 degrees Fahrenheit/80 degrees Celsius. Bake the kibble batter for 45 minutes or until the kibble is done. It should pull away from the sides of the pan and be lightly browned. Take the the pans out of the oven and cool before breaking the baked mixture apart into smaller chunks. Store the homemade kibble in an airtight container in the fridge. and ensure you date and label the container!

Or, if you choose to double the recipe, you can store the remainder in the freezer until ready to use. Thaw then serve.

Improvise!

You can also make the dog food meatier by adding meat juices, broth, gravy and meat drippings instead of water. You can also use dairy products such as milk, goat's milk and cottage cheese as part of the liquid portion. You can add any other animal fats to the recipe. For a much meatier option, add up to four cups of shredded or ground meat or fish to the batter.
Your dog will love your homemade kibble and treats. By making your own, you will be feeding your pet healthier, natural meals. Isn't your dog worth it?

Tuesday, August 17, 2010

51 Uses for Baking Soda

Using Baking Soda can potentially save you a nice sum of money every month.


Personal Care

1. Make Toothpaste
A paste made from baking soda and a 3 percent hydrogen peroxide solution can be used as an alternative to commercial non-fluoride toothpastes. (Or here’s a formula for a minty version.) You can also just dip your toothbrush with toothpaste into baking soda for an extra boost.

2. Freshen Your Mouth
Put one teaspoon in half a glass of water, swish, spit and rinse. Odors are neutralized, not just covered up.

3. Soak Oral Appliance
Soak oral appliances, like retainers, mouthpieces, and dentures, in a solution of 2 teaspoons baking soda dissolved in a glass or small bowl of warm water. The baking soda loosens food particles and neutralizes odors to keep appliances fresh. You can also brush appliances clean using baking soda.

4. Use as a Facial Scrub and Body Exfoliant
Give yourself an invigorating facial and body scrub. Make a paste of 3 parts baking soda to 1 part water. Rub in a gentle circular motion to exfoliate the skin. Rinse clean. This is gentle enough for daily use. (For a stronger exfoliant, try one of these great 5 Homemade Sugar Scrubs.)

5. Skip Harsh Deodorant
Pat baking soda onto your underarms to neutralize body odor.

6. Use as an Antacid
Baking soda is a safe and effective antacid to relieve heartburn, sour stomach and/or acid indigestion. Refer to baking soda package for instructions.

7. Treat Insect Bites & Itchy Skin
For insect bites, make a paste out of baking soda and water, and apply as a salve onto affected skin. To ease the itch, shake some baking soda into your hand and rub it into damp skin after bath or shower. For specific tips on bee stings, see Bee Stings: Prevention and Treatment.

8. Make a Hand Cleanser and Softener
Skip harsh soaps and gently scrub away ground-in dirt and neutralize odors on hands with a paste of 3 parts baking soda to 1 part water, or 3 parts baking soda to gentle liquid hand soap. Then rinse clean. You can try this honey and cornmeal scrub for hands too.

9. Help Your Hair
Vinegar is amazing for your hair, but baking soda has its place in the shower too. Sprinkle a small amount of baking soda into your palm along with your favorite shampoo. Shampoo as usual and rinse thoroughly–baking soda helps remove the residue that styling products leave behind so your hair is cleaner and more manageable.

10. Clean Brushes and Combs
For lustrous hair with more shine, keep brushes and combs clean. Remove natural oil build-up and hair product residue by soaking combs and brushes in a solution of 1 teaspoon of baking soda in a small basin of warm water. Rinse and allow to dry.

11. Make a Bath Soak
Add 1/2 cup of baking soda to your bath to neutralize acids on the skin and help wash away oil and perspiration, it also makes your skin feel very soft. Epsom salts are pretty miraculous for the bath too, read about the health benefits of epsom salt baths.
12. Soothe Your Feet

Dissolve 3 tablespoons of baking soda in a tub of warm water and soak feet. Gently scrub. You can also make a spa soak for your feet.

Cleaning
 
13. Make a Surface Soft Scrub
For safe, effective cleaning of bathroom tubs, tile and sinks–even fiberglass and glossy tiles–sprinkle baking soda lightly on a clean damp sponge and scrub as usual. Rinse thoroughly and wipe dry. For extra cleaning power, make a paste with baking soda, course salt and liquid dish soap—let it sit then scour off.

14. Handwash Dishes and Pots & Pans
Add 2 heaping tablespoons baking soda (along with your regular dish detergent) to the dish water to help cut grease and foods left on dishes, pots and pans. For cooked-on foods, let them soak in the baking soda and detergent with water first, then use dry baking soda on a clean damp sponge or cloth as a scratchless scouring powder. Using a dishwasher? Try these energy saving tips.

15. Freshen Sponges
Soak stale-smelling sponges in a strong baking soda solution to get rid of the mess (4 tablespoons of baking soda dissolved in 1 quart of warm water). For more thorough disinfecting, use the microwave.

16. Clean the Microwave
Baking soda on a clean damp sponge cleans gently inside and outside the microwave and never leaves a harsh chemical smell. Rinse well with water.

17. Polish Silver Flatware
Use a baking soda paste made with 3 parts baking soda to 1 part water. Rub onto the silver with a clean cloth or sponge. Rinse thoroughly and dry for shining sterling and silver-plate serving pieces.

18. Clean Coffee and Tea Pots
Remove coffee and tea stains and eliminate bitter off-tastes by washing mugs and coffee makers in a solution of 1/4 cup baking soda in 1 quart of warm water. For stubborn stains, try soaking overnight in the baking soda solution and detergent or scrubbing with baking soda on a clean damp sponge.

19. Clean the Oven
Sprinkle baking soda onto the bottom of the oven. Spray with water to dampen the baking soda. Let sit overnight. In the morning, scrub, scoop the baking soda and grime out with a sponge, or vacuum, and rinse.

20. Clean Floors
Remove dirt and grime (without unwanted scratch marks) from no wax and tile floors using 1/2 cup baking soda in a bucket of warm water–mop and rinse clean for a sparkling floor. For scuff marks, use baking soda on a clean damp sponge, then rinse. Read Natural Floor Cleaning for more tips on avoiding toxic floor cleaners.

21. Clean Furniture
You can make a homemade lemon furniture polish, or you can clean and remove marks (even crayon) from walls and painted furniture by applying baking soda to a damp sponge and rubbing lightly. Wipe off with a clean, dry cloth.

22. Clean Shower Curtains
Clean and deodorize your vinyl shower curtain by sprinkling baking soda directly on a clean damp sponge or brush. Scrub the shower curtain and rinse clean. Hang it up to dry.


23. Boost Your Liquid Laundry Detergent
Give your laundry a boost by adding ½ cup of baking soda to your laundry to make liquid detergent work harder. A better balance of pH in the wash gets clothes cleaner, fresher, and brighter.

24. Gently Clean Baby Clothes
Baby skin requires the most gentle of cleansers, which are increasingly available, but odor and stain fighters are often harsh. For tough stains add 1/2 cup of baking soda to your liquid laundry detergent, or a 1/2 cup in the rinse cycle for deodorization.

25. Clean Cloth Diapers
Dissolve ½ cup of baking soda in 2 quarts of water and soak diapers thoroughly.

26. Clean and Freshen Sports Gear
Use a baking soda solution (4 tablespoons Baking soda in 1 quart warm water) to clean and deodorize smelly sports equipment. Sprinkle baking soda into golf bags and gym bags to deodorize, clean golf irons (without scratching them!) with a baking soda paste (3 parts Baking sodato 1 part water) and a brush. Rinse thoroughly.

27. Remove Oil and Grease Stains
Use Baking soda to clean up light-duty oil and grease spills on your garage floor or in your driveway. Sprinkle baking soda on the spot and scrub with a wet brush.

28. Clean Batteries
Baking soda can be used to neutralize battery acid corrosion on cars, mowers, etc. because its a mild alkali. Be sure to disconnect the battery terminals before cleaning. Make a paste of 3 parts baking soda to 1 part water, apply with a damp cloth to scrub corrosion from the battery terminal. After cleaning and re-connecting the terminals, wipe them with petroleum jelly to prevent future corrosion. Please be careful when working around a battery–they contain a strong acid.

29. Clean Cars
Use baking soda to clean your car lights, chrome, windows, tires, vinyl seats and floor mats without worrying about unwanted scratch marks. Use a baking soda solution of 1/4 cup baking soda in 1 quart of warm water. Apply with a sponge or soft cloth to remove road grime, tree sap, bugs, and tar. For stubborn stains use baking soda sprinkled on a damp sponge or soft brush. Here’s how Sustainable Dave washes his car.

Deodorizing
30. Deodorize Your Refrigerator
Place an open box in the back of the fridge to neutralize odors.

31. Deodorize the Cutting Board
Sprinkle the cutting board with baking soda, scrub, rinse. For how to more thoroughly clean your cutting board, see How To Clean Your Cutting Boards.

32. Deodorize Trashcans
Sprinkle baking soda on the bottom of your trashcan to keep stinky trash smells at bay.

33. Deodorize Recyclables
Sprinkle baking soda on top as you add to the container. Also, clean your recyclable container periodically by sprinkling baking soda on a damp sponge. Wipe clean and rinse. Learn about how to recycle everythin.

34. Deodorize Drains
To deodorize your sink and tub drains, and keep lingering odors from resurfacing, pour 1/2 cup of baking soda down the drain while running warm tap water–it will neutralize both acid and basic odors for a fresh drain. (This a good way to dispose of baking soda that is being retired from your refrigerator.) Do you know what you’re not supposed to put down your drains?

35. Deodorize and Clean Dishwashers
Use Baking soda to deodorize before you run the dishwasher and then as a gentle cleanser in the wash cycle.

36. Deodorize Garbage Disposals
To deodorize your disposal, and keep lingering odors from resurfacing, pour baking soda down the drain while running warm tap water. Baking Soda will neutralize both acid and basic odors for a fresh drain.

37. Deodorize Lunch Boxes
Between uses, place a spill-proof box of baking soda in everyone’s lunch box to absorb lingering odors. Read bout safe lunch boxes here.

38. Remove Odor From Carpets
Liberally sprinkle baking soda on the carpet. Let set overnight, or as long as possible (the longer it sets the better it works). Sweep up the larger amounts of baking soda, and vacuum up the rest. (Note that your vacuum cleaner bag will get full and heavy.)

39. Remove Odor From Vacuum Cleaners
By using the method above for carpets, you will also deodorize your vacuum cleaner.

40. Freshen Closets
Place a box on the shelf to keep the closet smelling fresh, then follow these tips to organize your closet in an eco-friendly way.

41. Deodorizing Cars
Odors settle into car upholstery and carpet, so each time you step in and sit down, they are released into the air all over again. Eliminate these odors by sprinkling baking soda directly on fabric car seats and carpets. Wait 15 minutes (or longer for strong odors) and vacuum up the baking soda.

42. Deodorize the Cat Box
Cover the bottom of the pan with baking soda, then fill as usual with litter. To freshen between changes, sprinkle baking soda on top of the litter after a thorough cleaning. You can also use green tea for this purpose!

43. Deodorize Pet Bedding
Eliminate odors from your pets bedding by sprinkling liberally with baking soda, wait 15 minutes (or longer for stronger odors), then vacuum up.

44. Deodorize Sneakers
Keep odors from spreading in smelly sneakers by shaking baking soda into them when not in use. Shake out before wearing. When they’re no longer wearable, make sure to  donate your old sneakers.

45. Freshen Linens
Add 1/2 cup of baking soda to the rinse cycle for fresher sheets and towels. You can also make homemade lavender linen water with this formula.

46. Deodorize Your Wash
Gym clothes of other odoriferous clothing can be neutralized with a ½ cup of baking soda in the rinse cycle.

47. Freshen Stuffed Animals
Keep favorite cuddly toys fresh with a dry shower of baking soda. Sprinkle baking soda on and let it sit for 15 minutes before brushing off.

Miscellaneous
 
48. Camping Cure-all
Baking soda is a must-have for your next camping trip. Its a dish washer, pot scrubber, hand cleanser, deodorant, toothpaste,f ire extinguisher and many other uses.

49. Extinguish Fires
Baking soda can help in the initial handling of minor grease or electrical kitchen fires, because when baking soda is heated, it gives off carbon dioxide, which helps to smother the flames. For small cooking fires (frying pans, broilers, ovens, grills), turn off the gas or electricity if you can safely do so. Stand back and throw handfuls of baking soda at the base of the flame to help put out the fire–and call the Fire Department just to be safe. (And, you should have a fire entinguisher on hand anyway, here’s why.

50. Septic Care
Regular use of baking soda in your drains can help keep your septic system flowing freely.  1 cup of baking soda per week will help maintain a favorable pH in your septic tank.

51. Fruit and Vegetable Scrub
Baking soda is the food safe way to clean dirt and residue off fresh fruit and vegetables. Just sprinkle a little on a clean damp sponge, scrub and rinse. Here’s another way to clean your vegetables as well.


http://www.care2.com/greenliving/51-fantastic-uses-for-baking-soda.html

Beans, Beans The Musical Friut, The More You Eat The More You Toot

The Humble Bean is so under rated. Bean can rescue your food budget  and repel unwanted guest at the same time. Now that's multitasking at it's finest.


Listen To This Song About Beans While You Read.


 No,  Jelly Beans don't count


Get Into The Bean Scene by The Duke University Medical Center

There's an old tradition of eating black-eyed peas on New Year's Day to ensure prosperity for the rest of the year. But if you want health as well as wealth, you may want to make a New Year's resolution to eat more legumes the rest of the year too. These humble beans boast big benefits for those who eat them often: they can reduce your risk of heart disease and strokes, help prevent cancer, and even save money.   $$$$$$


The beans that come packed with these benefits are the starchy legumes: green peas, navy beans, lima beans, black-eyed peas, kidney beans, and more exotic varieties like garbanzos, black beans, lentils, and fava beans.


Despite their beautiful differences in color and taste, all the legumes have similar nutritional value. A serving (1/3 cup of cooked beans) contains around 80 calories, no cholesterol, lots of complex carbohydrates, and little fat. In addition, beans are a good source of B vitamins, potassium, and fiber, which promotes digestive health, relieves constipation, and may even help prevent colon cancer and reduce blood cholesterol (a leading cause of heart disease).
Not used to eating lots of legumes?


Here are some tips on incorporating more beans into your diet.


* Beans can be included in the pasta, bread, and grain food group--the base of the USDA's food pyramid, from which you should eat 6-11 servings each day.
But while they make a great side dish--think three-bean salad or baked beans--legumes are also a good substitute for meat. Even healthy cuts of meat, like lean meat and chicken, generally contain 150-225 calories per three-ounce serving as well as some saturated fat and no fiber (and they're more expensive than beans). And you don't have to go vegetarian to reap the benefits of legumes--start slowly, eating beans instead of meat twice a week.


* Legumes don't contain complete proteins like meat, but as long as you eat grain or dairy products over the course of the day, you will meet your nutritional needs. Many traditional bean dishes already contain these combinations--think of beans and rice, bean burritos, split pea soup with crackers.


* If you experience intestinal discomfort when you eat legumes, try changing the soaking water several times when you prepare dried beans, or switching to canned beans. The processing they go through gets rid of some of the gas-producing substances (just remember to rinse the beans well to wash off excess salt).


* Drinking adequate fluids and exercising regularly can also help your gastrointestinal system handle the increased dietary fiber. As you include more beans in your diet, your body should grow more accustomed to fiber and not experience as much intestinal gas.


* One last tip to help you avoid a common misadventure in bean-cooking: Beans will grow on you. Literally. Since the average dried bean triples in size when cooked, be sure to use a big enough pot so that they don't boil over.


Happy eating!
http://www.healthandgoodness.com/article/eating-beans.html

Saturday, August 14, 2010

Scrub Me Mama with a Boogie Beat : Homemade Laundry Detergent

This is a real money-saver. Almost makes one look forward to doing the laundry...Not!

The Andrew Sisters: This rhythm oughtta get you grooven to bust a move on 'Laundry Day'
Scrub Me Mama with a Boogie Beat


Now to save even more $$; Line dry your cloths.

Visit The Website:   Here

Friday, August 13, 2010

Grow Your Own Sprouts


from Homewood Garden Plot 41 by Jeannine from Pittsburgh


It's all of 1 °F outside, which is WAY too cold even for me to venture over to the garden plot!  But even in the dead of winter you can grow food for your table--honest! 

With a wide-mouthed Mason jar, sprouting lids, sprouting seeds, and a few inches of space on a windowsill, you can grow tasty and extremely nutritious sprouts for your salads, sandwiches and stir-fries! I discovered these sprouting lids and seeds in the Pinetree Garden Seeds catalog while I was putting together my seed order a few weeks ago, and thought, why not?  I've never grown my own sprouts before, but I've always enjoyed them on my salads.  Since they usually cost a pretty penny in the grocery store I assumed there must be some tricky technology involved in growing them.  There isn't!  Sprouting couldn't be easier.  Just measure out a couple of tablespoons of your sprouting seeds into a clean jar, cover them with water and put the screen lid on.  Let the seeds soak over night, and then pour out the water through the screen (which keeps the seeds inside the jar.)  Put the jar on its side on a windowsill.  Once a day rinse the seeds by filling the jar with water through the screen, and then dump it out again.  This takes all of about 10 seconds!  Within a week or so you'll have a quart jar full of ready-to-eat sprouts!

How cool is that?

Inexpensive and Homemade Cleaning Products

 By Thea Mann

There are a variety common household ingredients you can use to keep your house clean and fresh without stressing your budget. Because they are homemade products, and made from natural ingredients, they will not contain strong-smelling perfumes and chemicals.

When you create your own cleaning mixtures, you control the chemicals you use (it is possible to use completely non-toxic cleaning supplies). However, don’t believe that just because it is homemade it is necessarily harmless. Ammonia can be purchased cheaply and is often featured in homemade cleaning recipes, but it is not a product you can use carelessly. Bleach and isopropyl alcohol are also common household goods that are toxic.

While many of these homemade cleaning products are safer than those commercially available, they may not work as well as the commercial products. Before you invest a lot of time and money in homemade cleaners, experiment a little. Keep track of the time required to clean, and balance that against your desires for a non-toxic home. It may also require more of a product to get the same kind of clean, which could impact the cost savings. In general, making your own products will be less expensive, but sometimes if you begin adding essential oils and other side ingredients, you may find yourself spending the same amount as on commercial products.


Non-toxic ingredients:

Baking soda
is a very simple and effective surface cleaning. It is similar to commercial powdered abrasive cleaners and has the added benefit of being an odor absorber. Baking soda can be used alone with water and sponge to scrub out tough stains like a scouring powder, or it can be added to a solution to add extra deodorizing power. You can leave baking soda on particularly tough stains (even pots and pans) for 15 – 20 minutes before wiping away. Baking soda also works as a drain cleaner by adding up to a cup to the drain and adding a tiny bit of hot water. Let it stand for as long as overnight before flushing the drain with hot water. It will not work on completely blocked drains, but serves as a prevention method Combine ¾ cup baking soda with 2 tbsp cornstarch.(and a dry scent you favor) to make an inexpensive carpet freshener.

Borax (sodium borate)
is a great all-purpose cleaner and can be mixed with water, baking soda or white vinegar. Borax works as laundry soap, and can clean wallpaper, painted walls and painted surfaces.

Cornstarch
works well as a window cleaner, furniture polish and as a carpet cleaner and deodorizer. This mixes with many things without toxic results.

White vinegar
is another all-purpose cleaner that most people already have in their homes. When using vinegar for normal cleaning, you will want to dilute vinegar in an equal part water but it can be used straight from the bottle on tough stains and mineral deposits. Vinegar is a deodorizer, like baking soda, and is also a disinfectant. Because it is colorless and contains no colorants, it will not stain. Vinegar does not work well on marble or on grout, and may damage it because of vinegar’s acidity. The vinegar smell will linger while wet, but will quickly dissipate while drying. Vinegar is also an effective stain remover on sinks, floors, stovetops, chrome and countertops and can be used to remove rings from your toilet bowl! If you have family members with sensitive skin, adding half a cup of vinegar to your rinse cycle will quickly break down laundry detergent and act as a natural fabric softener.

Lemon juice
, another highly acidic liquid, works extremely well on hard water stains and on built-up soap scum. You can mix lemon juice with vinegar and/or baking soda to make a paste similar to Soft Scrub brand cleaning scrub or mix it with olive oil for a wood furniture polish. Lemon juice left to sit on a rust spot can completely erase the rust and hard water. This may need to be repeated several times before the spot is completely gone.

Salt
can be used as an alternative scouring powder and also works as a rust remover when paired with lime juice.

Club soda
is a great stain lifter for fabrics and can double as a glass cleaner. When using club soda as a stain lifter, allow it to soak into the stain before blotting. Do not rub the stain or you risk smearing it around.

Toxic ingredients:

Isopropyl (rubbing) alcohol
makes a brilliant window and glass cleaning cleaner. This is, of course, not as safe as the previous cleaners. It is also a powerful disinfectant for chrome and some kinds of ceramic tiles (test it in an inconspicuous area first). Alcohol also works well for cleaning dirty or dusty candles!

Ammonia
is a very inexpensive cleaning agent, but can be toxic, so use with care. Ammonia is a strong alkaline and works in situations in which vinegar is not working. Do not ever mix ammonia with bleach as it creates an extremely toxic gas. Ammonia left to stand in the oven over night will loosen grime from the surfaces without the same chemical assault (and cost) commercial oven cleaners. It may be necessary to follow up with some kind of abrasive, such as baking soda or steel wool. Rinse with warm soapy water, as you definitely do not want ammonia residue lingering in your oven.

Chlorine bleach
, another potentially dangerous chemical, is an inexpensive disinfectant/mildew remover. Dilute ¾ cups of bleach in 1 gallon of water to thoroughly clean and disinfect your shower or other areas that attract mold and mildew.

In the end, the decision to use homemade products is an issue of personal preference. If you stick to the non-toxic ingredients, you will be contributing to the health of the environment through not adding those chemicals to the ground water and air. You will probably save money, but the trade off may be a little more elbow grease to get your house clean


 Original Article: HERE

The Many Money-Saving Uses for Vinegar


1. Add 1/4 cup vinegar to laundry , along with the usual soap, to
brighten colors and make whites sparkle. This will also act as a fabric softener. Also helps kills athlete’s foot germs on socks
.

2. Soak or simmer stuck-on food in 2 cups of water and 1/2 cup of
vinegar. The food will soften and lift off in a few minutes. 


3. Remove ink stains from clothes by soaking them in milk for 1 hour. Then cover the stain with a paste of vinegar and cornstarch. When the paste dries, wash the garment as usual. 4. Appliances sparkle if cleaned with a vinegar and borax cleaner. Mix 1 teaspoon borax, 1/4 cup vinegar, and 2 cups hot water and put it into a spray bottle. Spray it on greasy smears and wipe off with a cloth or sponge.

5. Deodorize your sink drains: Pour a cup down your drain, let stand about thirty minutes, then run cold water.

6. Use vinegar instead of laundry softener. Vinegar prevents your clothes from getting that waxy build up on them. Vinegar is suggested for using to rinse cloth diapers to keep them absorbent.

7. Remove water stains from leather by rubbing with a cloth dipped in a vinegar and water solution.

8. Loosen food grime and clean the microwave: Place a microwave-safe bowl with 2 cups water, 1/2 cup vinegar inside the microwave and microwave on full power for 3-4 minutes (it needs to boil). Keep your microwave
closed for a few minutes to allow the steam to loosen the grime, then open your microwave, carefully remove the bowl, and wipe clean.

9. Remove grease from kitchen walls: Put straight vinegar on a dishcloth to wipe grease off kitchen walls, or the stovetop.

10. Prevent mold and mildew in the shower: Wipe down tile or Formica shower walls with a sponge or cloth dampened with water and vinegar. The vinegar will clean the walls and inhibit the growth of mold and mildew.

11. An excellent toilet cleaner can be made from 1 cup borax and 1 cup vinegar. Pour the vinegar all over the stained area of the toilet.
Then sprinkle the borax over the vinegar. Allow it all to soak for 2 hours. Then simply brush and flush.

12. Add a cup of vinegar to your mop water or mop floors with vinegar and water after a normal mopping. Vinegar removes the soap scum.

13. Annie Berthold-Bond says her favorite window cleaning recipe is to combine 2 cups of water, 1/4 cup of white distilled vinegar, and up to 1/2 teaspoon of liquid soap or detergent in a spray bottle. Annie says the liquid soap helps remove the waxy residue.

14. Boil vinegar and water on the stove to soak up bad smells from your house.

15. Fill your water reservoir halfway with vinegar to clean your coffee pot. Follow up by running 1-2 pots of clean water through to remove the vinegar.

16. Vinegar also works as a safe de-greaser. No harsh fumes. Use it on grease, undiluted.

17. Clean vaporizers and humifiers by soaking unit in vinegar. Soak unit and then run water through it. I know, I got this tip from the actual directions that came with my vaporizer, but it really does help to remove the deposits and also to sanitize.

18. After washing your whites with bleach, run another rinse cycle with vinegar. The vinegar will help to remove the bleach smell.

19. If you have fruit flies, put some vinegar in a jar on your counter. 


20. If your puppy (or child) has an accident on the carpet, apply
full-strength plain white vinegar for about 10 minutes and then blot dry. You may want to test an inconspicuous spot first. 


21. Adding a cup of vinegar to a dishwashing cycle will help clean your dishwasher and will also help prevent spots from forming on your glasses.

22. Vinegar helps to kill bacteria. Mix up a solution of vinegar and water in a spray bottle. Keep it in your kitchen to spray your sink and countertops.

23. Use vinegar to clean your garbage disposal. Run a tray of ice cubes with 1/2 cup vinegar poured over them.

24. Use vinegar, hot water, and a little soap to clean baby’s toys. Rinse well.

25. I have Pergo floors. I was glad to find this tip from Frugal Living. Mix 1/3 part white vinegar, 1/3 part rubbing alcohol, 1/3 part water, and 3 drops dishwashing liquid. Mix this into a (recycled) spray bottle and you have the equivalent of the Pergo floor cleaner. Just spray and mop; also great for deodorizing a room and for a fast cleanup. I also use this on my tile floors with great results. Pergo is better off when water doesn’t sit on it too long, the alcohol is added to make it dry faster.


Image and video hosting by TinyPic

Thursday, August 12, 2010

Oh Yes You Can: Home Canning

Six YouTube videos on home canning.
If you don't already have your canning jars better start now
..flea markets, charity shops, freecycle, Craig's List...
Fall is just around the corner !!!


Wednesday, August 11, 2010

Home Made Granola

granola4.jpeg
 Store bough granola is very expensive and not always the 'healthy'. choice This recipe is very healthy.  The initial cost in buying all of the ingredients up front is a bit costly but will yield mutliple batches for breakfast cereal, yogurt topping and healthy snacks.


Granola
3 1/2 cups rolled oats
1/2 cup coconut flakes, unsweeteend
3 tablespoons flax seeds
3 tablespoons sesame seeds
1/4 cup sunflower or pumpkin seeds
1/2 cup toasted mixed nuts, chopped (I used pistachios and almonds here)
2 teaspoons cinnamon
1 teaspoon sea salt
1/4 cup brown sugar
1/4 cup canola oil
2 tablespoons honey
1 tablespoon pure maple syrup
2 teaspoons pure vanilla extract
2 cups mixed dried fruit ie. raisins, cranberries, cherries, blueberries, dates.

Preheat the oven to 375. Line a rimmed baking sheet with aluminum foil. In a large bowl, combine all the ingredients except the dried fruit. Stir well to incorporate.
Spread the mixture on the prepared baking sheet, spreading it out into an even layer. Bake for 20 to 30 minutes (depending on the depth of golden-ness you’re looking for), stirring every 10 minutes.
Remove the granola from the oven and and cool completely, in its pan, on a wire wrack. Once the granola is cool, mix in the dried fruit.

NOTE: I would keep this refrigerated, but that's just me.

http://thekitchensinkrecipes.com/2008/01/04/homemade-granola-im-warning-you/

Tuesday, August 10, 2010

Who Are Cuke Skywalker, Obie Wan Cannolie and Dark Tater?

Okay, so we all know that while living on foodstamps shopping organic is but a pipe-dream -but- you can grow organic. Yes yes, plant a veggie garden, eat like Queen and laugh at those dumb-asses in the grocery stores paying $$$$$$$ for a 6oz. bag of chemical laden not and so fresh veggies

shhhhhhh, no talking during the movie.

Monday, August 9, 2010

Unemployment is capitalism's way of getting you to plant a garden. ~Orson Scott Card

Meet Little Miss 'Molly' McGee
While Molly was out in her patch of the yard this morning (ahem) "reading the news paper"  I took the opportunity to pick my lunch.  I picked a cucumber, an onion, a green pepper, a few basil leaves and a few parsley leaves. Below are pictures of the salad I made.

And they say there's no such thing as a' free lunch'....Ha!

Bubble, Bubble, Toil and Trouble: A 'Witches' Brew...just kidding but it is magic

Irish Cream ~ Nectar of The Gods  

What's a girl to do when a bottle of Bailey's Irish Cream cost around $25.00,  the same $25.00 needed to keep your phone service active ?

Well I'm glad you asked that........

'You make your own of course'

"Irish whiskey mixed with cream and sugar with hints of coffee, chocolate, vanilla and almond. Will keep for 2 months if refrigerated."

Ingredients:
1 cup heavy cream
1 (14 ounce) can sweetened condensed milk
1 2/3 cups Irish whiskey
1 teaspoon instant coffee granules
2 tablespoons chocolate syrup
1 teaspoon vanilla extract
1 teaspoon almond extract

Directions:
1.    In a blender, combine heavy cream, sweetened condensed milk, Irish whiskey, instant coffee, chocolate syrup, vanilla extract, and almond extract. Blend on high for 20 to 30 seconds. Store in a tightly sealed container in the refrigerator. Shake well before serving.

Enjoy, you deserve it.