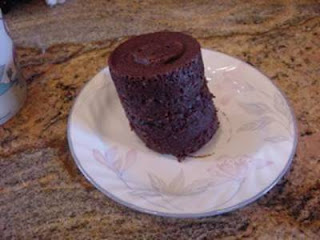
I can't believe someone thought of this!!!! But OH how SWEET it is!!!!!
THE 5 MINUTE CHOCOLATE CAKE FOR ONE PERSON.......HOW NEAT
5 MINUTE CHOCOLATE MUG CAKE
4 tablespoons flour
4 tablespoons sugar
2 tablespoons cocoa
1 egg
3 tablespoons milk
3 tablespoons oil
3 tablespoons chocolate chips (optional)
A small splash of vanilla extract
1 large coffee mug (MicroSafe)
Add dry ingredients to mug, and mix well. Add the egg and mix thoroughly.
Pour in the milk and oil and mix well..
Add the chocolate chips (if using) and vanilla extract, and mix again.
Put your mug in the microwave and cook for 3 minutes at 1000 watts.
The cake will rise over the top of the mug, but don't be alarmed!
Allow to cool a little, and tip out onto a plate if desired.
EAT ! (this can serve 2 if you want to feel slightly more virtuous).
And why is this the most dangerous cake recipe in the world?
Because now we are all only 5 minutes away from chocolate cake at any time of the day
Living On Food Stamps: The purpose of This blog is to share ideas and to offer encouragement. In the comment section Please share your story and how you are managing during these tough economical times. I truly believe through friendships, encouragement, love, compassion and sharing we will get through this and perhaps even come out wiser and stronger.
Peace
Wednesday, September 29, 2010
Never Have To Buy Paper Napkins/Towles Again: How To Make Your Own Clothe Napkins

Reposted with thanks to:
Make your own cloth napkins « Skip To My Lou
-
Here are two versions, one with mitered corners and the other with square corners. First pre-wash the fabric. Cut fabric into a square 1" larger than the desired finished size. I cut 17 inch squares so that I would have 16 inch napkins.
Mitered Corner Napkin Instructions
-
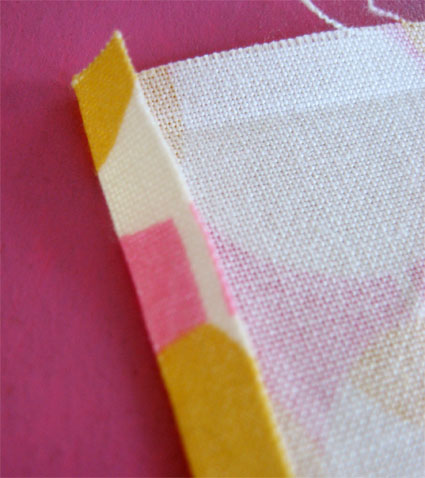
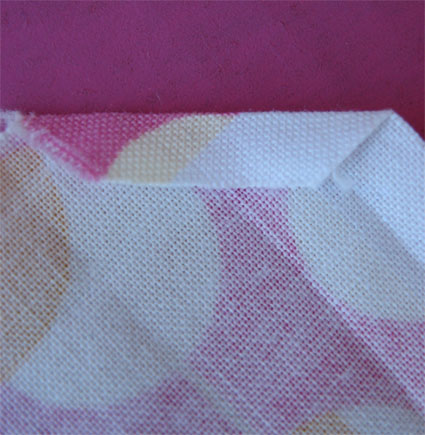
Iron edge over 1/4 inch.
Moving clockwise, iron next edge 1/4 inch over. Iron all four sides then fold first side over again another 1/4 inch. Do all four sides moving clockwise.
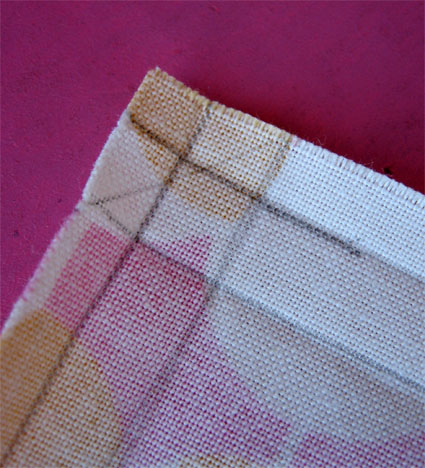
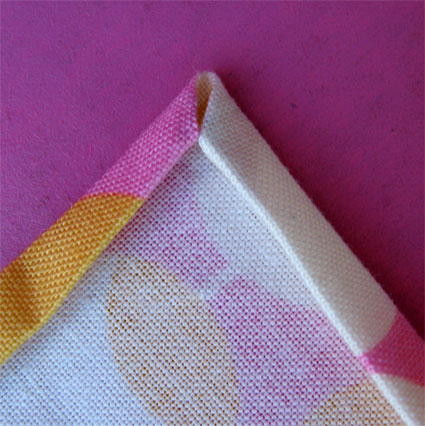
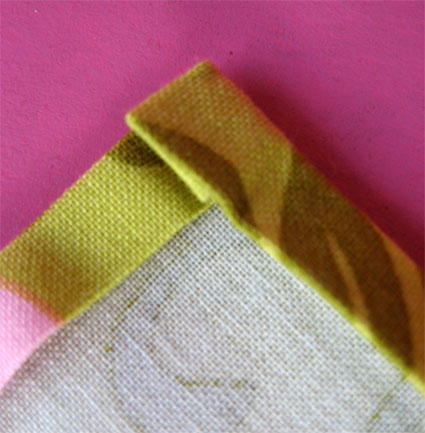
Open up corner.
Cut off top of corner.
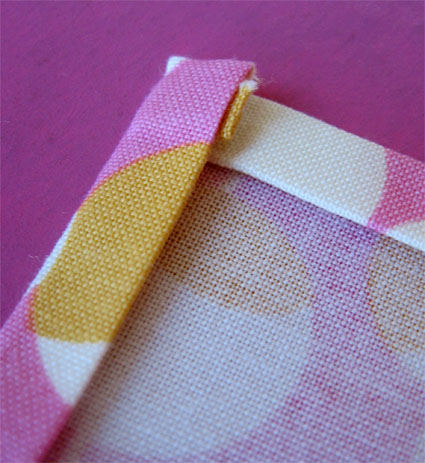
Fold top edge down (to corner of second fold line) and iron.
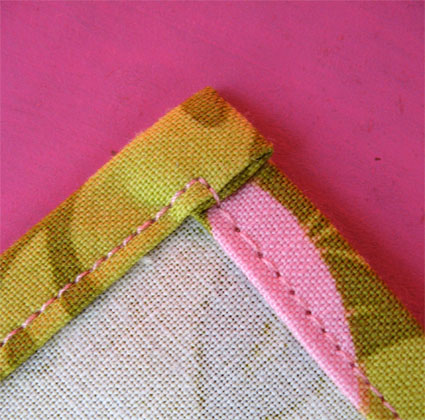
Fold the side edge to the middle on each side (folding on press lines - fold side down then fold again to make corner). Repeat until all four sides have mitered corners.
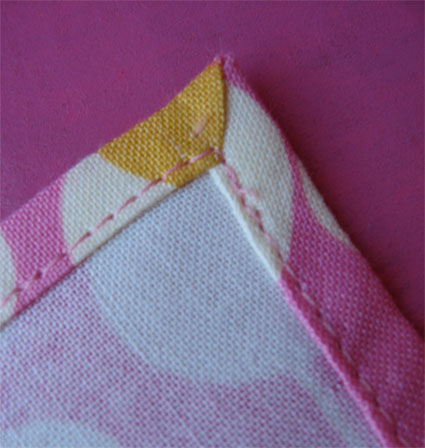
Sew all the way around the edge of napkin.
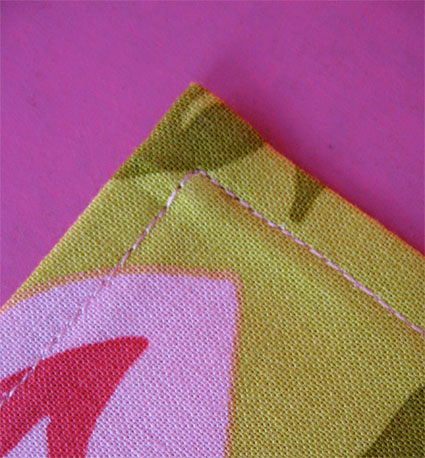
Finished with a mitered corner napkin!
Square Corner Napkin Instructions
-
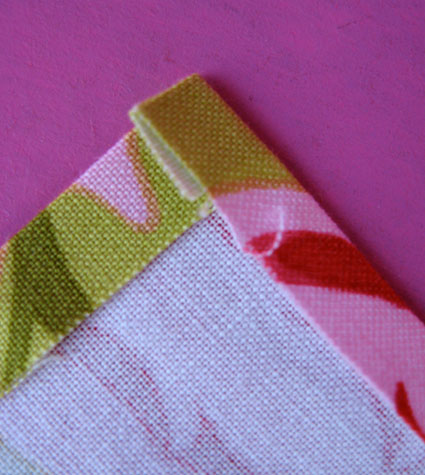
To make a napkin with square corners, iron edge over 1/4 inch. Moving in clockwise direction iron next side 1/4 inch until all four sides have been pressed 1/4 inch.
Now fold over edges another 1/4 inch (moving in a clockwise direction).
When all four sides have been folded over twice, sew all the way around the edge of the napkin. I think most people sew straight off the edge on each side, but my sewing machine doesn't like sewing through those layers.
I also like the way it looks from the front.
Finished!

Tuesday, September 28, 2010
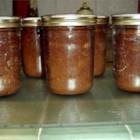
Banana Nut Bread Baked in a Jar
| http://allrecipes.com/Recipe/Banana-Nut-Bread-Baked-in-a-Jar/Detail.aspx |
 |
|
"This traditional banana bread features an ingenious twist: It is baked in a canning jar! Such a fun and unique presentation makes it perfect for gifts."
INGREDIENTS:
2/3 cup shortening 2 2/3 cups white sugar 4 eggs 2 cups mashed bananas 2/3 cup water 3 1/3 cups all-purpose flour | 1/2 teaspoon baking powder 2 teaspoons baking soda 1 1/2 teaspoons salt 1 teaspoon ground cinnamon 1 teaspoon ground cloves 2/3 cup chopped pecans |
DIRECTIONS:
| 1. | Preheat oven to 325 degrees F (165 degrees C). Grease insides of 8 (1 pint) straight sided, wide mouth canning jars. |
| 2. | In a large bowl, cream shortening and sugar until light and fluffy. Beat in eggs, bananas, and water. Sift together flour, baking powder, soda, salt, cinnamon, and cloves. Add to banana mixture. Stir in nuts. |
| 3. | Pour mixture into greased WIDE MOUTH pint jars, filling 1/2 full of batter. Do NOT put lids on jars for baking. Be careful to keep the rims clean, wiping off any batter that gets on the rims. |
| 4. | Bake at 325 degrees F (165 degrees C) for 45 minutes. Meanwhile, sterilize the lids and rings in boiling water. |
| 5. | As soon as cake is done, remove from oven one at a time, wipe rims of jars and put on lid and ring. Jars will seal as cakes cool. Place the jars on the counter and listen for them to "ping" as they seal. If you miss the "ping", wait until they are completely cool and press on the top of the lid. If it doesn't move at all, it's sealed. |
| 6. | Jars should be eaten immediately or kept sealed in refrigerator for up to a week. |
Friday, September 24, 2010
Crochet A Rag Rug

When I find myself worrying about something, anything, everything, for example; space junk...what if it falls on me (it could happen)? Or what if there's a big Land Grab on the Moon and I can't afford the gas to get there (that too could happen)? Anyway, my point here is this: Making a gazillion million knots with a crochet hook is quit cathartic and the bonus is in the end you've got a lovely rug to show for it.
Many years ago (back in the 70's) I found an article about how to crochet rag rugs. I did managed to make a small one although I've no idea whatever happened to it. Anyway I got to thinking about it because I have lots of old sheets, well, actually lots and lots of old sheets, shirts, pants, etc.
You cut or tear your sheets -or- whatever into strips then sew the ends together to make a long continual strip that you wind into big balls like you would yarn. You wind and wind and wind (that too is quit cathartic) as you're so preoccupied with winding that long, long strip of sewn together material the next thing you know you've almost forgotten about the infestation of killer fire ants in Africa and the possibility of them crawling on a log float on an ocean tide and washing up in Pittsburgh.....but I digress.... I think I am going to make my rug via 'granny squares' Granny Square Patterns
then sew the squares together rather than the round or oval shape for no other reason than to make a larger sized rug easier to handle. The Video below will show you the basics: BTW, my end product looked a lot nicer than the ones in this video.
A picture I found on the internet

Wednesday, September 22, 2010
Make A Deep Dish Pizza In A Cast Iron Skillet
I made a deep dish pizza in my cast iron frying pan (this is a pic I found on the internet) at the time I didn't think to take a picture of 'my' pizza. Anyway, I needed to replace 2 of my frying pans because the Teflon coating was peeling off and that's suppose to be really, really bad stuff to ingest so I decided to get cast iron so I'd never have to replace them again. While I was standing in line to pay (with my son's money) a woman who was in line ahead of me mentioned how much she loves her cast iron pans and that she makes Deep Dish Pizzas in her cast iron fry pan. I thought that was a wonderful idea so the following day I made a White Spinach-Feta pizza. My son David whom I live with was quit dubious about the idea but after tasting it he was sold! Now he request pizza 2-3 times a week.
NOTE: Below is a recipe of no-knead pizza dough. I have not tried this recipe yet so I can not comment on it, however it sounds good so I do plan to try it this weekend.
No Knead Pizza Dough
(Olive Oil Dough Master Recipe)
Ingredients:
This recipe is easily doubled or halved
2 - Loaf Recipe
1 3/8 C (11 oz.) Lukewarm water
3/4 T (.38 oz.) granulated yeast
3/4 T Salt
½ T Sugar
1/8 C (2 oz.) Extra virgin olive oil
3 1/4 C (16.25 oz.) Unbleached all purpose
flour
Directions:
1. Mix the yeast, salt, sugar and olive oil with the water in a 5-qt bowl, or a lidded
(not airtight) food container
2. Mix in the flour without kneading, using a large wooden spoon.
3. Cover (not airtight) and allow to rest at room temperature for about 2 hours.
You can use the dough at this point, or refrigerate and use over next 12 days. If
you refrigerate at least overnight, you'll develop better flavor in the dough. You can freeze the
dough as well. http://flyfishohio.us/bread.htm
NOTE: If you hate making dough you can buy the frozen bread dough in the freezer isle.

Monday, September 20, 2010
Make Pickles In An Hour ~ UPDATED 9/24/10
NOTE: I made these and I'm not in love with them -but- to be fair I must admit I think it's through my own error.

- I think I added too much 'vinegar' in the vinegar to water ratio.
- I didn't realize that I bought the Bread & Butter pickling spice when I wanted Dill (I am no fan of bread & butter pickles)
- Before last night I never made a pickle in my life
- I used regular 'ole salad cucumbers that I bought at from Shop & Save on sale 2 for $0.88 -even so- They did turned out very crisp after sitting in the refrigerator over night.

Quick pickles, are done for flavor rather than preservation. The results are much quicker (hence, the name), but the flavors are not as complex and they won't keep nearly as long. Still, the rewards of quick pickles are many, and with very little effort you could be enjoying them before the sun goes down tonight.
Steps to follow:
Because we're not making these pickles to be preserved, we can avoid the laborious canning process with its boiling and sterilizing and its accompanying nagging fear of lurking botulism. We're simply going to make an acidic brine and use it to soak our vegetables.
Just about anything can be quick pickled. Cucumbers are the most common choice, but any nice crisp vegetable will do: green beans, cauliflower, carrots, shallots, onions, asparagus — they all make terrific pickles.
Because there are so many different and subtle variations in pickle preparations, everything from the dilution of the vinegar to the inclusion or not of sugar to the selection of flavoring spices, we recommend starting with actual recipes rather than just diving right in. We'll give you a good one at the end of this, and the Internet is filled with gazillions more.
The steps you take:
1 Make the brine: The main ingredient in pickle brine is vinegar. White vinegar is most common, but you can also use cider vinegar, wine vinegar, pretty much anything except balsamic, which is too syrupy and would overpower your pickles. Some recipes call for straight vinegar, others dilute it with up to 3 times its volume with water.
Salt is nearly always included in the brine. It draws moisture out of the vegetables, and it encourages the growth of useful bacteria. Amounts vary, from less than a teaspoon to over a tablespoon per cup of liquid.
Many recipes include sweeteners. Sugar is most common, but you'll also see brown sugar and honey. Sweeteners are most often used when vinegar is not diluted with water.
And finally, spices. Many commercial "pickling spice" blends are available and work very well. The most common ingredients are mustard seed, dill seed, peppercorns and garlic, but any spices can be used.
The process is simple: combine all the ingredients in a saucepan and bring to a boil, stirring to dissolve the salt and sugar completely.
2 Prep your vegetables: Remember that the entire pickle is eaten, so depending on what you're pickling, you'll want to trim off any inedible pieces. This could be the ends of green beans or the root ends of onions or garlic. You may also prefer to cook some of your vegetables, like asparagus, first. Also, if you're cutting your vegetables into pieces, make sure they're all relatively the same size to ensure the consistency of the final product.
3 Submerge your pickles: Place your vegetables in a clean, dry glass container, then pour in the boiling brine to submerge them completely. If they're not completely covered, you can add water to bring the level of the brine up over the top. Refrigerate for at least an hour to give the brine a chance to work its magic. The longer you brine, the tastier they'll be. Quick pickles keep in the fridge for up to 10 days, and you'll be enjoying crunchy snacks all week long.
ctc-goodeating@tribune.com
Quick pickled cucumbers
Prep: 10 minutes Cook: 2 minutes Chill: 1 hour Makes: 1 pint
1 cup cider vinegar
1/2 cup water, plus more, if needed
2 teaspoons each: kosher salt, pickling spice
1 large cucumber, cut into 1/4-inch slices
1 Combine cider vinegar with 1/2-cup of water, salt and pickling spice in a small saucepan. Heat to a boil.
2 Place cucumber in a clean, dry glass container just large enough to hold all the slices. Pour boiling brine over cucumber slices to cover completely. If all cucumbers are not submerged, add cold water to cover. Cover; refrigerate at least 1 hour. Pickles will keep for about 10 days.
Nutrition information: Per 2 slices: 3 calories, 0% of calories from fat, 0 g fat, 0 g saturated fat, 0 mg cholesterol, 1 g carbohydrates, 0 g protein, 80 mg sodium, 0 g fiberw
Saturday, September 18, 2010
Have Stale Bread and can't bare to toss it out ~ Make Pudding!
Two Recipes here: 1. Bread Pudding. 2. Pumpkin Bread Pudding
Bread Pudding
Ingredients:
2 cups whole milk (or 2 cups half & half)
1/4 cup butter
2/3 cup brown sugar (light or dark, depending on taste preference)
3 eggs
2 teaspoons cinnamon
1/4 teaspoon ground nutmeg
1 teaspoon vanilla extract
3 cups bread, torn into small pieces (french bread works best) **NOTE: I use whatever I have .
1/2 cup raisins (optional)
Directions:
1. In medium saucepan, over medium heat, heat milk (or half & half) just until film forms over top. Combine butter and milk, stirring until butter is melted. Cool to lukewarm.
2. Combine sugar, eggs, cinnamon, nutmeg, and vanilla. Beat with an electric mixer at medium speed for 1 minute. Slowly add milk mixture.
3. Place bread in a lightly greased 1 1/2 quart casserole.
4. Sprinkle with raisins if desired. Pour batter on top of bread.
5. Bake at 350 degrees F for 45 to 50 minutes or until set. Serve warm.
If you make the sauce to put on top of your bread pudding, adjust the sugar in the bread pudding recipe, change it to 1/3 cups sugar (the sauce has the other 1/3 cup in it).
Bread Pudding Sauce
Ingredients:1 cup whole milk
2 Tablespoons butter
1/3 cup granulated white sugar
1 teaspoon vanilla
1 Tablespoon flour
dash of salt
Directions:
Mix everything together and bring to a boil for 3 - 4 minutes, stirring constantly. Set aside for 5 minutes, then pour on warm bread pudding.
Pumpkin Bread Pudding
Ingredients:
* 8 ounces French bread, torn into small pieces, about 5 cups
* 2 cups half-and-half, or half milk and half cream
* 3 large eggs
* 2/3 cup granulated sugar
* 2/3 cup brown sugar
* 1 can (15 ounces) pumpkin puree
* 1 cup dried cranberries -or- raisins
* 3 tablespoons melted butter
* 1 teaspoon ground cinnamon
* 1/2 teaspoon ground nutmeg
* 1/2 teaspoon ground ginger
* 1 teaspoon vanilla
* cinnamon sugar, optional
Preparation:Butter an 11x7-inch baking dish. Heat oven to 350°.
In a bowl, cover the torn bread with the half-and-half; set aside.
In another bowl, combine eggs, sugars, pumpkin, cranberries, melted butter, spices, and vanilla; blend well. Pour pumpkin mixture over soaked bread and stir to blend.
Pour mixture into the prepared baking dish. Sprinkle top with cinnamon-sugar, if desired. Bake for 45 to 60 minutes, or until set.
Serve with a vanilla dessert sauce or brown sugar sauce, whipped cream, or vanilla ice cream.
Serves 8.
Homemade Instant Flavored Coffee Recipe ~Gifts In A Jar~
 |
| These make wonderful gifts and with the Holidays just around the corner this little gem of an idea can be a real stress-buster , Just put them in Mason Jars, label, add the directions, a bow, and you have a thrifty gift -plus- every time the receiver of this thoughtful gift enjoys a delicious cup of coffee he or she will think of you. |
**NOTE: Add all ingredients in a blender and blend into a fine ground of uniform size (under a minute should do) before putting into Mason Jars.
Cafe Viennese
Ingredients:
Part 1:
1/4 cup sugar
1/4 tsp almond extract
1/4 tsp vanilla extract
Part 2:
3/4 cup instant coffee
1/2 cup non-dairy powdered creamer (Coffee-Mate)
1/2 cup skim milk powder
1 tsp cinnamon
Directions
- Step 1: Mix the sugar with both the almond and vanilla extracts (Ingredients Part 1). Stir with a fork until there is no more moisture.
- Step 2: Stir in the rest of the ingredients (Ingredients Part 2). Sift everything together to blend thoroughly.
- Step 3: Store in an airtight container and use 2 to 3 tsp per 1 cup of boiling water.
Homemade Instant Cappuccino Recipe
1/4 tsp nutmeg
1/2 tsp cinnamon
1/2 cup sugar
3/4 cup instant coffee (granules)
1 cup instant hot chocolate (powder)
1 cup non-dairy creamer (powder)
Directions:
- Mix all ingredients well. Store in an airtight container.
- Use 2 to 3 TBS per mug of boiling hot water, stir to dissolve.
Amaretto Mocha Recipe Mix
Ingredients:1 cup skim milk powder
2/3 cup Coffee-Mate
1/2 cup brown sugar
1/2 cup sifted cocoa
1/3 cup Instant coffee
2 tsp Almond extract
Directions:
- Mix all ingredients together and store in an airtight container or jar with lid.
- Use 1/3 cup per 1 cup hot boiling water, stir until dissolved.
Spiced Mocha Mix
Ingredients:1 cup cocoa
1 cup sugar
1/2 cup non-dairy powdered creamer
1/4 cup instant coffee
1 tsp ground cinnamon
1/2 tsp ground nutmeg
Directions:
- Mix all ingredients together and store in an airtight container. Use approximately 1/4 cup mix per 1 cup hot water.
Monday, September 13, 2010
How I Make Homemade Yogurt Without A Yougart Maker
I made yogurt today for the very first time....I'm as happy as a pig in poo!!! It turned out perfectly even though I used the Oven Method. Instructions Below ( two different methods)
This is a basic recipe for homemade yogurt using commercial full fat milk. The yogurt is delicious as is, but can be made into the thick yogurt that is such a favorite in Greek cooking by straining.
Ingredients:
1. Heat the milk just to the boiling point and pour into a non-metal container.
2. Let cool to lukewarm (100-105F). A skin will form on top.
3. Mix the 2 tablespoons of yogurt (homemade or commercial) with 2 tablespoons of milk.
4. Add to the lukewarm mixture, carefully pouring down the side so that any skin that may have formed on top is not disturbed. *NOTE: I disturbed the skin when I stirred in the culture & poured the milk into the canning jars and my yogurt turned out fine.
5. Cover with a clean dishtowel and place on another towel in a warm, dry place for at least 8 hours (or overnight) until it thickens. * NOTE: I put my yogurt in my electric roaster set at 150 (that's the lowest setting on my roaster) and left the lid askew -and- kept a candy thermometer lying on the rack and made sure the inside temp did not exceed 115 F. Temps above 115 will kill the love culture.
Note: 8 to 12 hours is best. The longer the yogurt coagulates beyond that time, the more sour the taste becomes. *NOTE: My cultured milk turned into yogurt within 3 hours
6. Carefully drain any excess liquid.
7. Refrigerate for 4 hours before using.
8. Store in the refrigerator and use within 4-5 days.
9. Don't forget to save a small amount to make the next batch!
The yogurt can be eaten as is, along with the creamy skin on top.
You will need a thermometer. A candy thermometer bought from the grocery store will work just fine. You will need a large pot to heat up your milk and then something to incubate your yogurt for about 12 hours. The temperature of the yogurt must stay between 90 and 110 degrees during this incubation time.
It is important that during the incubation period that your temperature stays between 90 and 110 degrees.
 |
| I brought milk almost to boiling (stirring constantly so it didn't scorch) |
 |
| I then Cool down to 100 Deg F. then added approx. 3 Tablespoons of plain yogurt with live culture after adding the live starter I then poured it into two 1 pint wide mouth canning jars. |
 |
| My Oven Is Broken So I Used My Electric Roaster Oven, adding about an inch of water to the bottom |
 |
| I added about an inch of water to the bottom of the roaster then sat a plate on the rack and then sat the canning jars filled with the cultured milk onto the plate for stability purposes. |
 |
| And now I have Yogurt ! |
This is a basic recipe for homemade yogurt using commercial full fat milk. The yogurt is delicious as is, but can be made into the thick yogurt that is such a favorite in Greek cooking by straining.
Ingredients:
- 1 quart (32 ounces) of full fat sheep or cow's milk (pasteurized)
- 2 tablespoons of previously homemade yogurt or plain unflavored yogurt with active live cultures
- 2 tablespoons of full fat milk (same type)
1. Heat the milk just to the boiling point and pour into a non-metal container.
2. Let cool to lukewarm (100-105F). A skin will form on top.
3. Mix the 2 tablespoons of yogurt (homemade or commercial) with 2 tablespoons of milk.
4. Add to the lukewarm mixture, carefully pouring down the side so that any skin that may have formed on top is not disturbed. *NOTE: I disturbed the skin when I stirred in the culture & poured the milk into the canning jars and my yogurt turned out fine.
5. Cover with a clean dishtowel and place on another towel in a warm, dry place for at least 8 hours (or overnight) until it thickens. * NOTE: I put my yogurt in my electric roaster set at 150 (that's the lowest setting on my roaster) and left the lid askew -and- kept a candy thermometer lying on the rack and made sure the inside temp did not exceed 115 F. Temps above 115 will kill the love culture.
Note: 8 to 12 hours is best. The longer the yogurt coagulates beyond that time, the more sour the taste becomes. *NOTE: My cultured milk turned into yogurt within 3 hours
6. Carefully drain any excess liquid.
7. Refrigerate for 4 hours before using.
8. Store in the refrigerator and use within 4-5 days.
9. Don't forget to save a small amount to make the next batch!
The yogurt can be eaten as is, along with the creamy skin on top.
Homemade Yoghurt: Oven Method
You will need a thermometer. A candy thermometer bought from the grocery store will work just fine. You will need a large pot to heat up your milk and then something to incubate your yogurt for about 12 hours. The temperature of the yogurt must stay between 90 and 110 degrees during this incubation time.
It is important that during the incubation period that your temperature stays between 90 and 110 degrees.
Thursday, September 9, 2010
Pumpkin Pie Flavored Coffee Beans 'Oh My'
 |
Pumpkin Pie Flavored Coffee (1lb bag) Pumpkin Pie Flavored Coffee (1lb bag) Discover the heartwarming spices of our Pumpkin pie gourmet flavored coffee. Arabica gourmet coffee beans drenched in tempting spice flavors such as nutmeg and cinnamon allow the aroma of this coffee to fill the air and draw you in. Freshly roasted, our coffee alone is superior. Add to that the captivating aroma of Pumpkin pie and you're going to love our flavored coffee! A heat-sealed valve bag will ensure the freshest coffee which will be fresh roasted the day it's bought $11.95 Well, let me tell you; I got heart palpitations when I saw the price! I just knew that I had to race home and blog about this tout de suite. Here's what I do: I buy whatever coffee beans are on sale or at Walmart, Dollar Store, wherever I can get them cheaper than cheap . I always buy the 'coffee beans' because I think freshly ground beans just taste better (if you don't have a grinder and buy pre-ground beans you can still get an awesomely delicious cup of Pumpkin Pie Spice cup of coffee) I grind my coffee beans, pour the grounds in the filter and add as much Pumpkin Pie Spice to the grounds as I think appropriate and brew as usual. In the end I have get a Delicious cup of Pumpkin Pie Spiced cup of coffee for less than half the price plus I get the benefits of REAL spices and not the artificial 'flavors' that are used in most flavored coffees. You can use this same technique to make other flavored coffee like Egg Nog using nutmeg, or Vanilla flavored coffee, Cinnamon flavor. Middle Eastern people flavor their coffee and tea with Cardamom, use your imagination. I enjoy sitting down at my computer with a nice steamy cup of coffee and dream up ways to NOT to give my money to Big Evil Corporations ...but that's just me ;) 'Frugal' <----- is good. |
Mix Your Own Pumpkin Pie Spice Mix
 Pumpkin Pie Spice is obscenely expensive. And we are fast approaching Pumpkin Pie, Pumpkin Bread, Pumpkin 'Everything' season so whattaya do (that was a rhetorical question)? I'll tell you what I did: I went to a Dollar Store and bought 2 oz. jars of each: Cinnamon, Nutmeg, Ginger, All Spice & Ground Clove for $1 each. Total: 10 oz. of spices for $5.
  |
| 1.12 oz. For $4.98 |
<---- opposed to.
Pumpkin Pie Spice #1
1/4 cup cinnamon
1 Tbsp. allspice
1 1/2 tsp. each ginger and nutmeg
1 tsp. cloves
Pumpkin Pie Spice #2
1/4 cup ground cinnamon
1/8 cup ground ginger
1 Tablespoon nutmeg
1 Tablespoon ground cloves
Pumpkin Pie Spice #3
Pumpkin Pie Spice
1/4 cup ground cinnamon
2 tbsp ground ginger
2 tsp ground cloves
1 tsp ground nutmeg
1/2 tsp ground cardamom (optional)
Apple Pie Spice
1/4 cup ground cinnamon
1 tbsp ground allspice
2 tsp ground nutmeg
2 tsp ground ginger
1/2 tsp ground cardamom (optional)
Combine all ingredients and seal in ziploc or vacuum seal bag (or jar).
I like to quadruple the recipe & store it in a Jelly Canning Jar.
Let me know what you think.
Cheap Bulk Spices
 |
| I'll Ground Half of These Whole Cloves With A Mortar & Pestle |
Adding New Life To An Older Outdated Computer~For Free
My laptop (Acer Aspire) is close to five years old, well in computer years that like fifty years old. This laptop has served me well and without grief. I did have to replace the battery so some months back I bought an extended life battery on ebay that is AWESOME and cost $40 less than an Acer 6 cell battery..... but I digress, anyway...
I'm pretty fed up with Windows and all the viruses Windows is susceptible to. I've been hit with 4 major Trojan infection in the past three months.
A year ago my son gave me an Intel Mac desktop, Mac's operating system is so secure that I haven't bothered to install an anti-virus on it (although I really should) and still haven't been plagued any viruses. Since I am just about 'dirt poor' there's no way possible I'm able to get to get my hands a Mac Laptop so I looked into Ubuntu.
Ubuntu is a free open source Linix based Operating System ...and it's supposedly very secure. And what makes Ububtu even more attractive is; it will run on older computers -So- I downloaded and installed it into my laptop. There's a few ways you can do this but I chose the dual boot option. Ubuntu had all of the drivers my laptop needed ie. wifi, built in cam, etc.
Well, I am here to tell you that I am in love with Ubuntu so much so that if it were a man I would want to have it's baby! Okay, so that's a bit extreme but you get my point, Ubuntu is that good. It comes with a lot of software, all free for example Open Office which is similar to Microsoft Office and can open Office documents. Ubuntu is well worth taking a look at.
P.S. If you're not computer savvy and too apprehensive to experiment with your main computer and just so happen to have an older, unused computer sitting in a corner collecting dust it can't hurt to checkout Ubuntu:
 |
| Ubuntu Desktop |
 |
| Thunderbird Mail Client (Ubuntu has several other mail options) |
 |
| One of several Browser options |
Tuesday, September 7, 2010
No Knead Bread
No Knead Bread

No Knead BreadFrom the kitchen of: Joe ValencicAdapted from Mark Bittman of NY Times who got it from Sullivan Street Bakery.
Yield: one 1-1/2 lb loafINGREDIENTS:3 cups bread flour or all purpose flour (I use unbleached all purpose flour for this bread)1/4 teaspoon instant yeast3/4 tablespoon kosher salt (or 1-1/2 teaspoons table salt)1 1/2 cups warm waterCovered pot (3 1/2-quart or larger cast iron, Pyrex, ceramic, enameled cast iron, Corningware casserole dish (the 5 quart works great), even the liner from a Crock Pot with its lid...something that can go into a 450F oven.)1. Mix dough: The night before, combine all ingredients in a big bowl with a silicone spatula until the dough just comes together. It will be a shaggy, doughy mess. Cover with oiled plastic wrap, or just slip it into a plastic shopping bag and tuck the handles under the bowl, and let sit 12-20 hours on countertop.2. Shape and preheat: The dough will now be wet, sticky and bubbly. With a wet spatula, dump the dough on a well floured surface. Fold ends of dough over a few times with the spatula and nudge it into a ball shape. You can use your hands if you like, just keep your hands wet so that the dough does not stick. Generously dust a cotton towel (not terrycloth) with flour (I like to use parchment paper sprayed with cooking spray). Set dough seam side down on top of towel (or parchment paper). Flour and fold towel over the dough. Let it nap for 1 to 1-1/2 hours. When you've got about a half hour left, slip your covered pot into the oven and preheat to 450F.3. Bake: Your dough should have doubled in size. Remove pot from oven. Holding towel, dump wobbly dough into pot (or, pick up parchment paper and set it right into the pot). Doesn't matter which way it lands. Shake to even dough out. Cover. Bake 30 minutes. Uncover, bake another 15-20 minutes or until the crust is beautifully golden and middle of loaf is 200-210F. Remove and let cool on wired rack, and listen to it ‘crackle’ as it cools. Let it cool for at least an hour (if you can resist), before slicing into it. If not eating right away, you can re-crisp crust in 350F oven for 10 minutes. I like to toast it and spray it with a little extra virgin olive oil.Alternate Recipe by weight:1# Unbleached all-purpose flour1/4 teaspoon Instant Yeast1-1/2 teaspoon Salt13 oz. Lukewarm water
No-Knead Bread AdaptationsNo-Knead Italian Herb ~ Add 2T of mixed Italian herbs to base recipe.No-Knead Flax Seed ~ Add 1/4 C flax seeds to base recipe.No-Knead Dakota~ Add 1/2 C Kings Diet Trail Mix (buy at Marc’s) to base recipe.No-Knead Craisin-Raisin ~ Add 1/4 C craisins & º C raisins to base recipe.No-Knead Rye ~ Follow basic no-knead recipe method.3/4 C Dark rye flour2 1/4 C All purpose flour3/8 t Instant Yeast1 1/2 t Salt13 oz. WaterNo-Knead Wheat ~ Follow basic no-knead recipe method.3/4C Whole wheat flour2 1/4 C All purpose flour3/8t Instant Yeast1 1/2 t Salt13 oz. Water


Subscribe to:
Comments (Atom)

